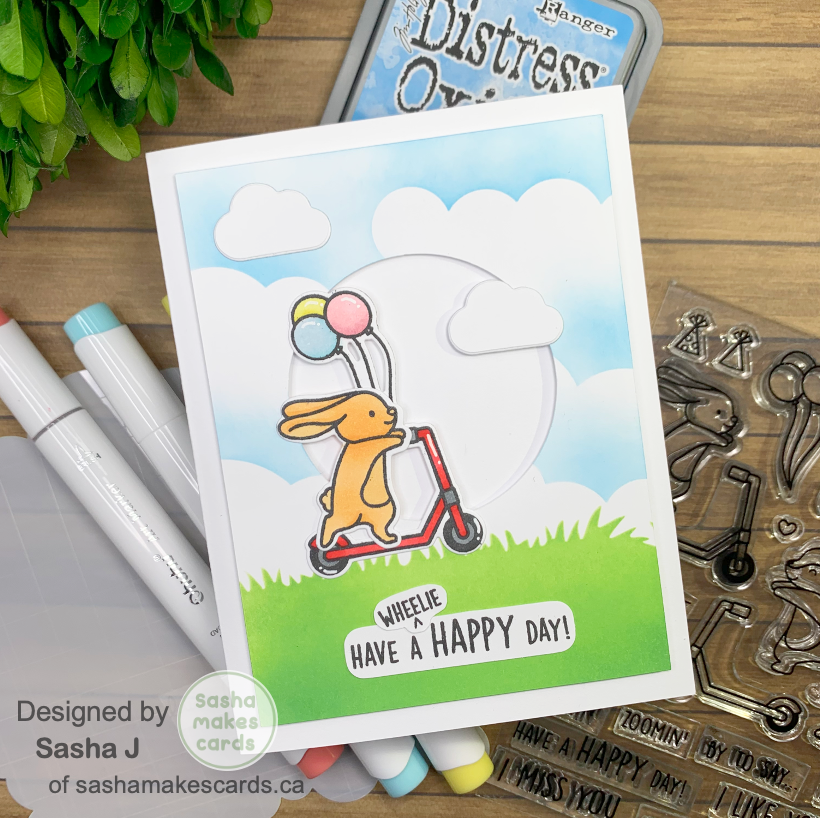
Screen Shot 2023-04-27 at 2.54.57 PM

A Clean and Simple Card – Hello Bluebird

Hi friends! Although I love fun, bright, and colourful cards, I wanted to try making some more clean and simple cards. So, I present to you… a clean and simple card!

I stamped some images from Hello Bluebird’s “Maverick” stamp set and coloured them using the following Ohuhu alcohol markers:

Fox: YR3, Y4, Y1, Y3, CGII00

Plane: NG03, CGII00, 120, PB6, PB8

I then stamped a sentiment onto the card front and attached the fox and plane onto a cut-out circle (which is actually from my previous card! I like to save my scraps). To finish, I attached the circle to the card using foam squares!

While I love clean and simple cards, it’s hard for me to keep my cards clean and simple… but I definitely want to make more!

Thanks for reading. Catch ya next time!

Sasha J


Products Used

  • Hello Bluebird Maverick Stamp Set
  • Ohuhu Alcohol Markers
  • White Jelly Roll Pen
  • Basic White Cardstock
  • Lawn Fawn Jet Black Premium Ink Pad
  • Stamp Press
  • Foam Squares
  • Double Sided E-Z Runner Grand Adhesive Tape Dispenser
  • Bearly Art Glue
Screen Shot 2023-04-27 at 10.42.21 AM

Peaceful Country Scene – Lawn Fawnatics Challenge #147

Hi friends! Today’s card is for the Lawn Fawnatics Challenge #147: “Create a scene: city vs country,” and I have decided to do country! While I am much more of a city person, a country-themed card came more naturally to me.

Using the Lawn Fawn Cloudy Stencil and Salty Ocean Distress Oxide, I first created a simple sky scene on the card front. I used my Cricut cutting machine to cut out the circle on the card front. I then used the Simon Hurley Create Scene Maker Stencil and Mask along with Mowed Lawn Distress Oxide to create a simple grass field.

I used Lawn Fawn Jet Black Premium Ink Pad to stamp several images and sentiments from the Scootin’ By stamp set. I coloured the images using the following Ohuhu alcohol markers:

Scooter: R1, R2, NG03

Bunny: YR240, YR250, Y120

Balloons: BG3, BG4, RV260, RV270, Y030, Y050

I also die-cut a couple of clouds from the Beary Rainy Day set to add to the card. Once everything was die-cut and ready, I assembled all the elements to create the perfect country scene!

Thanks for reading. Catch ya next time!

Sasha J


Product Used

  • Lawn Fawn Scootin’ By Stamps and Coordinating Dies
  • Lawn Fawn Beary Rain Day Coordinating Dies
  • Lawn Fawn Cloudy Stencil
  • Lawn Fawn Jet Black Premium Ink Pad
  • Simon Hurley Create Scene Maker Stencil and Mask
  • Salty Ocean Distress Oxide
  • Mowed Lawn Distress Oxide
  • Blending Brushes
  • Ohuhu Alcohol Markers
  • White Jelly Roll Pen
  • Basic White Cardstock
  • Sizzix Big Shot
  • Bearly Art Glue
  • Joy! Crafts Foam Tape
  • Fiskars Portable Paper Trimmer, 12”
  • Fiskars Titanium Micro-Tip Easy Action Scissors, 6”
Screen Shot 2023-04-26 at 11.54.07 AM

Embossing with a Stencil?!

Hi friends! Today’s card is made using a new tool I recently added to my craft collection – the Sizzix silicone rubber and impressions pad, which allows you to emboss stencils! I was really excited to try this tool out. It opens the door to so many new crafting possibilities!

Using the Festive Fall Stencil from Echo Park Paper Co, I embossed white cardstock using the already-mentioned Sizzix embossing tools. I lightly sprayed the cardstock with water to get a prominent embossed image.

I then used the stencil normally, ink blending a variety of distress oxides and inks to create a rainbow of bright colour. I used the following oxides and inks:

– Saltwater Taffy

– Spiced Marmalade

– Mustard Seed

– Mowed Lawn

– Salty Ocean

– Wilted Violet

Now that I have ink blended and embossed using the same stencil, I trimmed both panels in a way where the ink-blended panel would align with the embossed panel when placed together – it is kind of like a puzzle! After trimming them, I arranged and attached the pieces to an A2 card base.

For the sentiment, I chose the “celebrate” sentiment from the Hello Bluebird Birthday Script Stamp set and fussy cut it using Fiskars 6” spring-assisted scissors. I then attached the sentiment to the card.

I love how this card turned out! You can never go wrong with a simple card!

Thanks for reading! Catch ya next time!

Sasha J


Products Used

  • Echo Park Paper Co Festive Fall Stencil
  • Hello Bluebird Birthday Script Stamp Set
  • Sizzix Embossing Tools – Silicone Rubber and Impressions Pad
  • Sizzix Big Shot
  • Spray Bottle with Water
  • Lawn Fawn Jet Black premium ink pad
  • Spiced Marmalade Distress Oxide
  • Mustard Seed Distress Oxide
  • Mowed Lawn Distress Oxide
  • Salty Ocean Distress Oxide
  • Wilted Violet Distress Ink
  • Blending Brushes
  • Basic White Cardstock
  • Stamp Press
  • Fiskars Portable Paper Trimmer, 12”
  • Bearly Art Glue
  • Double Sided E-Z Runner Grand Adhesive Tape Dispenser
  • Fiskars Titanium Micro-Tip Easy Action Scissors, 6”
Screen Shot 2023-04-25 at 11.55.56 AM

Spring Bird – Sizzix

Hi friends! Today’s card was made using some Sizzix products, with some inspiration from nature!

I recently added the “Spring Bird” Sizzix Thinlits die cut designed by Jenna Rushforth to my craft collection and wanted to make a card with it because, well… it’s spring! It just so happens that earlier in the day, I saw a pair of American Goldfinches, so when I sat down to figure out the colours for my card, I knew I wanted to try and recreate this bird using this die cut!

To pair with the bright yellow of the American Goldfinch, I chose to do the flowers in blue and red. I also decided to die-cut the leaves in two shades of green that complemented the other colours nicely.

Once I had die-cut all my pieces, assembled them, and attached them to the card, I stamped a sentiment from the “Good Vibes #3” Stamp set from Sizzix designed by Pete Hughes. This sentiment was perfect for this card.

To finish, I used foam tape to attach the card front to an A2 card base.

Thanks for reading. Catch ya next time!

Sasha J


Products Used

  • Sizzix Thinlits Spring Bird designed by Jenna Rushforth
  • Sizzix Good Vibes #3 Stamp Set designed by Pete Hughes
  • Sizzix Big Shot
  • Bearly Art Glue
  • Basic White Cardstock
  • Neenah Astrobright Cardstock
  • Recollections Cardstock
  • Finesse by Spectrum Noir Noir Black Ink
  • Stamp Press
  • Joy! Crafts Foam Tape
  • Fiskars Titanium Easy Action Bent Scissors, 10”
texture rainbow main

Fun with Colour and Texture!

Hi friends! Today’s card is for the current Simon Says Stamp Monday challenge, “Rainbow,” but it’s also a texture challenge. For this challenge, I decided to use a puffy-embossing technique I learned from Marta Debicka – Drop of Sunshine on YouTube. It is a really fun technique and a great way of adding texture and dimension to your crafty projects!

I first stamped seven different animals from a few different Lawn Fawn sets (I will have the sets listed below) so that I could colour each animal a different colour of the rainbow. I used the following Ohuhu alcohol markers:

Red Elephant: R1, R2, R12

Orange Mouse: YR170, YR250, Y120

Yellow Elephant: Y120, Y3, Y030

Green Owl: GY1, GY2

Blue Hedgehog: PB7, B070, B220

Purple Mouse: V030, V250, V230

After fussy-cutting and die-cutting my images, I used Elmer’s School Glue, Black Ranger Embossing Powder, Honey Bee Stamps Perfect Bricks Background Stencil, and a heat tool to create a puffy embossing effect. I did this by mixing some embossing powder with the glue, spreading it over the stencil, and heating it. While simple, it adds a lot of interest to the card!

Before assembling the card, I stamped a sentiment using Lawn Fawn’s Dandy Day Stamp Set onto the card front. I then attached everything to the card base. I used foam squares to elevate each of the animals.

Thanks for reading! Catch ya next time!

Sasha J

Products Used

  • Lawn Fawn Elephant Parade Stamp Set and Coordinating Dies
  • Lawn Fawn Dandy Day Stamp Set
  • Lawn Fawn S’more the Merrier Stamp Set
  • Honey Bee Stamps Perfect Bricks Background Stencil
  • Ranger Black Embossing Powder
  • Heat Tool
  • Palette Knifes
  • Lawn Fawn
  • Ohuhu Alcohol Markers
  • Basic White Cardstock
  • Black Cardstock
  • Fiskars Portable Paper Trimmer, 12”
  • Double Sided E-Z Runner Grand Adhesive Tape Dispenser
  • Foam Squares
  • Sizzix Big Shot
  • Stamp Press
  • Lawn Fawn Jet Black Premium Ink Pad
  • Spectrum Noir Finesse (Noir Black)
  • Fiskars Titanium Micro-Tip Easy Action Scissors, 6”
  • Elmer’s School Glue
RAM G main

Simple Friendship Card – RAM Stamps

Hi friends! Today’s card features another digi stamp, but this time from RAM Stamps! The stamp I used for this card is called “Giraffe & Bird,” I thought it would make for a perfect friendship card, so I decided to do that!

After choosing a sentiment, I printed both the image and sentiment onto basic white cardstock. I rounded the corners of the sentiment with a corner punch (to give it a softer look) and coloured the digi stamp using the following Ohuhu alcohol markers:

Giraffe: Y3, Y030, YR240, Y120, WG050, WG01

Bird: B070, B050, B030, YR240, Y120

Flowers: RV270, RV260

I then used the Spellbinders Hand Drawn Scallops Embossing Folder to emboss the card front. I wanted to keep this card simple, so embossing the background was the perfect way to add interest.

To finish this card, I attached the card front to an A7 card base and used foam squares to pop up both the sentiment and the image.

Thanks for reading. Catch ya next time!

Sasha J


Products Used:

  • RAM Stamps “Giraffe & Bird” Digi Stamp
  • Spellbinders Hand Drawn Scallops Embossing Folder
  • Ohuhu Alcohol Markers
  • Basic White Cardstock
  • Foam Squares
  • Double Sided E-Z Runner Grand Adhesive Tape Dispenser
  • Sizzix Big Shot
bb digi

Rainbows and Digi Stamps – Penguin Palace

Hi friends! For today’s card, I decided to have some fun with stencils and the “Beautiful Brazil” Digi stamp set from Penguin Palace! This is also my submission for the Penguin Palace Challenge #24 – Stencilling and the Simon Says Stamp Wednesday Challenge “Things with Wings.”

The stencil I used for this card was a generic one, but it was exactly what I was looking for! I used the following distress oxides and inks to create a rainbow of colour:

  • Candied Apple
  • Spiced Marmalade
  • Mustard Seed
  • Mowed Lawn
  • Salty Ocean
  • Wilted Violet

I then printed and cut this parrot and sentiment from the “Beautiful Brazil” Digi stamp – I thought the parrot would match the rainbow colours perfectly! I used the following Ohuhu alcohol markers to colour:
Bird: RV260, RV270, E280, WG050, R1, R2, PB8, B070, Y1, Y2
Drum: E280, WG050, G190, G170

I attached my card front to an A7 card base and then attached the image and sentiment with foam squares to add some dimension – and with that, the card is finished!

While this is a simple card, I like how it turned out! There is nothing wrong with keeping things simple!

Thanks for reading. Catch ya next time!

Sasha J


Products Used:

  • Penguin Palace Beautiful Brazil Digi Stamp Set
  • Stencil
  • Candied Apple Distress Ink
  • Spiced Marmalade Distress Oxide
  • Mustard Seed Distress Oxide
  • Mowed Lawn Distress Oxide
  • Salty Ocean Distress Oxide
  • Wilted Violet Distress Ink
  • Blending Brushes
  • Ohuhu Alcohol Markers
  • Basic White Cardstock
  • Fiskars Portable Paper Trimmer, 12”
  • Double Sided E-Z Runner Grand Adhesive Tape Dispenser
  • Foam Squares
shaped main

Mama Elephant Shaped Card – Up We Go!

Hi friends! Today’s card is for the Simon Says Stamp Wednesday Challenge “Shaped Card!” I have never made a non-squared/rectangular-shaped card, so this was a fun challenge for me. Let me tell you about how I made this card!

After making a circular card base, I stamped some images and a sentiment from the Mama Elephant “Up We Go” stamp and die set. This is an older set but still a really fun one to use, and it was perfect for what I wanted to do!

I coloured the images using the following Ohuhu alcohol markers:

Reds: R1, R2

Oranges: YR170, YR250

Yellows: Y3, Y030, Y050

Greens: GY1, Gy2

Blues: PB7, B070

Purples: V230, V250

I created the background using Salty Ocean and Faded Jeans Distress Oxides and the Lawn Fawn Cloudy Stencil – I wanted the little dog to be floating up into the sky!

I die-cut my coloured images and cropped the corners of my sentiment to better match the shape of the card. I used foam squares to elevate the yellow dog and balloons to add some interest and then attached everything to the card. And with this, the card is finished!

I loved making this circular card. This challenge helped me step outside my comfort zone and make a card I otherwise would not have made. This is one of the many reasons I love participating in challenges!

Thanks for reading. Catch ya next time!

Sasha J


Products Used

  • Mama Elephant Up We Go Stamp and Die Set
  • Stamp Press
  • Ohuhu Alcohol Markers
  • Lawn Fawn Cloudy Stencil
  • Lawn Fawn Jet Black Premium Ink Pad
  • Faded Jeans Distress Oxide
  • Salty Ocean Distress Oxide
  • Blending Brush
  • Basic White Cardstock
  • Sizzix Big Shot
  • Fiskars Titanium Micro-Tip Easy Action Scissors, 6”
  • Fiskars Portable Paper Trimmer, 12”
  • Bearly Art Glue
  • Double Sided E-Z Runner Grand Adhesive Tape Dispenser
  • White Jelly Roll Pen
  • Foam Squares
  • Spectrum Noir Finesse (Noir Black)
  • Round Corner Punch
lala main

Summer Birthday Card – La La Land Crafts

Hi friends! As the weather starts to warm up, I have really started to look forward to summer and all the fun activities that come with the season. So, I decided to make a summer-themed card! This card was made with La-La Land Crafts “Stay Cool” stamp set.

I first stamped this elephant using Lawn Fawn Jet Black premium ink pad and decided on a complementary colour scheme using the following Ohuhu alcohol markers:

Elephant: V230, V250, RV260, RV270

Tube: G170, 190

Using my Fiskars spring-assisted scissors, I then fussy cut my elephant. I tend to avoid using stamp sets without dies in my card designs. However, today – since this is the perfect stamp set for a summer-inspired card – I decided to practice my fussy cutting skills, and I must say that I am rather impressed with myself! You will never improve if you don’t practice.

After fussy cutting the elephant, I started on the background. Using three shades of blue Ohuhu alcohol markers (B050, B070, PB8), and a white jelly roll pen, I created a water effect by laying down different abstract shapes on one another. I created this pattern on both the main card front panel and on three smaller shapes to add depth to the water. The white jelly roll was added on top of the shapes to give more of a water effect.

Using foam squares, I adhered the smaller shapes to the main card front and placed the elephant on top. I also stamped a fun sentiment from the stamp set – you can’t go wrong with a good pun!

I love how this card turned out! I am very proud of the water pattern I’ve created using Ohuhu alcohol markers. I also enjoyed being able to practice my fussy cutting to create a super fun, summer-themed card!

Thanks for reading. Catch ya next time!

Sasha J


Products Used:

  • La La Land Crafts Stay Cool Stamp Set
  • Lawn Fawn Jet Black premium ink pad
  • Ohuhu Alcohol Markers
  • White Jelly Roll Pen
  • Basic White Cardstock
  • Fiskars Portable Paper Trimmer, 12”
  • Stamp Press
  • Bearly Art Glue
  • Double Sided E-Z Runner Grand Adhesive Tape Dispenser
  • Foam Squares
  • Spectrum Noir Finesse (Noir Black)
  • Fiskars Titanium Micro-Tip Easy Action Scissors, 6”
Card #4 Large

Colourful Bats! – Lawn Fawnatics Challenge #146

Hi friends! Today’s card is for the Lawn Fawnatics challenge #146, “Colour Inspiration!”

As soon as I saw the colours for this colour inspiration challenge, I immediately knew I wanted to do a sunset/sky-themed card! Knowing this, I looked through my stash of Lawn Fawn products to figure out what sets I wanted to use, and I found the perfect set – the Fangtastic Friends and Fangtastic Friends Add-on stamp sets!

Using the Lawn Fawn cloudy stencil, I used the following inks and oxides to create a sky/sunset background:

– Faded Jeans

–  Salty Ocean

– Mustard Seed

– Pickled Raspberry

– Wilted Violet

Along with a sentiment, I stamped and coloured several bats from the Fangtastic Friends and Fangtastic Friends Add-on stamp sets to match the different colours of the clouds in the background. I used the following Ohuhu alcohol markers to colour the bats:

– Blue bat: B220, B260, B250

– Purple bat: V250, V230, V270

– Pink bat: RV260, RV270, R23

– Yellow bat: Y1, Y3, Y030

After colouring everything, I glued everything to my card to complete the project.

I had a lot of fun creating this card and adore how it turned out! This was a really fun colour combo that I would not have otherwise used!

Thanks for reading. Catch ya next time!

Sasha J


Products Used:

  • Lawn Fawn Fangtastic Friends
  • Lawn Fawn Fangtastic Friends Add-on
  • Lawn Fawn Cloudy Stencil
  • Lawn Fawn Jet Black Premium Ink Pad
  • Faded Jeans Distress Oxide
  • Salty Ocean Distress Oxide
  • Mustard Seed Distress Oxide
  • Pickled Raspberry Distress Oxide
  • Wilted Violet Distress Ink
  • Blending Brushes
  • Ohuhu Markers
  • Stamp Press
  • Basic White Cardstock
  • Sizzix Big Shot
  • Fiskars Portable Paper Trimmer, 12”
  • Bearly Art Glue
  • Double Sided E-Z Runner Grand Adhesive Tape Dispenser