IMG_5202 2

Red, White, & Blue Picnic Scene – CIC #572 Reminder

Hello friends! This is the reminder for Cupcake Inspirations Challenge #572, which is red, white, and blue.

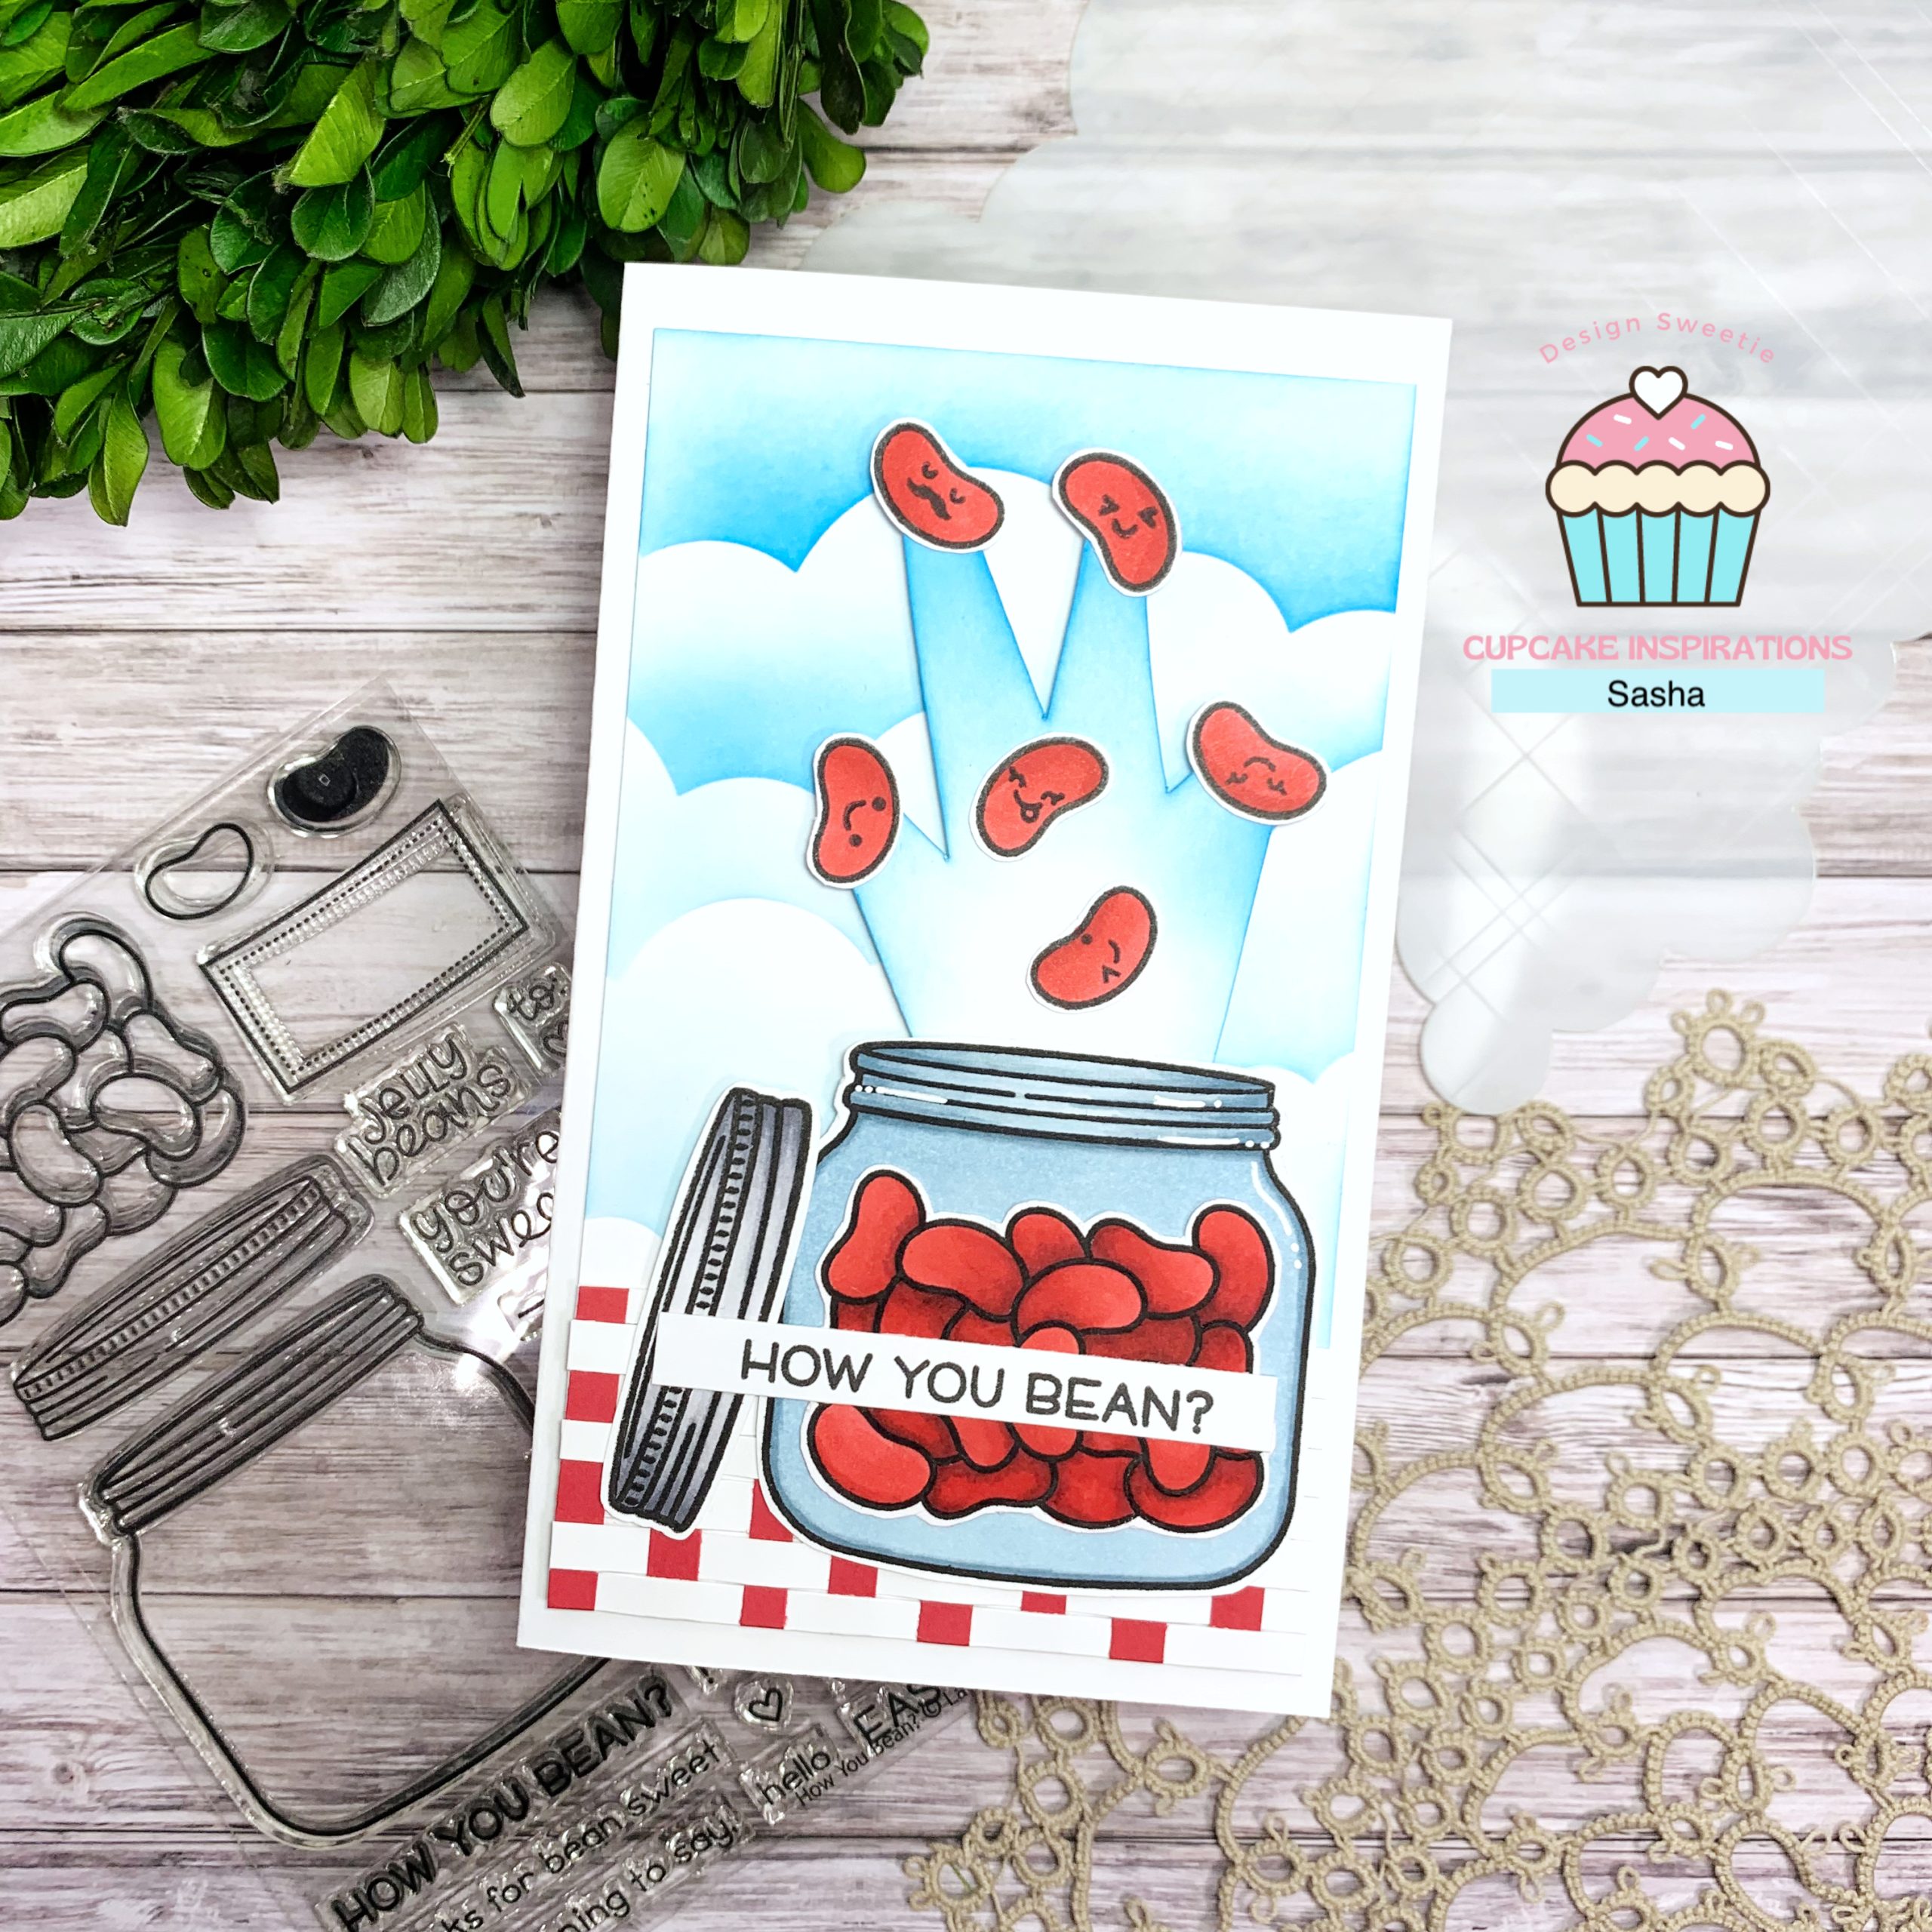
This week I’m sharing a red, white, and blue picnic-themed card perfect for the start of summer!

Using the Lawn Fawn How You Bean Stamp Set, I started by stamping some images and colouring them using the following Ohuhu alcohol markers:

  • Beans: R8, R2, R1
  • Jar: MG060, BGII03, MG020
  • Top: CGII04, CG2, CGII00

I then used the Lawn Fawn Cloudy Stencil and Salty Ocean Distress Oxide to create the sky background. I also used Salty Ocean Disress Oxide on a piece of cardstock I cut to make it look as if the beans were exploding out of the jar!

As for the picnic blanket, I cut thin strips of red and white cardstock and weaved them together to resemble a classic red and white picnic blanket perfect for this challenge!

To finish, I attached everything to a mini slimline card base.

Be sure to check out the amazing inspiration from the rest of the Design Sweeties for challenge #572 and to submit a red, white, and blue card for a chance to be featured as a Sweet Pick!

Thanks for reading. Catch ya next time!

Sasha J


Products Used

  • Lawn Fawn How You Bean Stamp Set
  • Lawn Fawn Jet Black Premium Ink Pad
  • Ohuhu Alcohol Markers
  • White Jelly Roll Pen
  • Fiskars 6″ Spring Assisted Scissors
  • Foam Tape
  • Bearly Art Glue
IMG_5417 Large

Fun with Embroidery Hoop Dies! – Lawn Fawn

Hello friends! For Today’s card, I decided to have some fun with a die set I have not played around with yet since getting – and that’s the Lawn Fawn Embroidery Hoops! I was a little intimidated at first (as I have never tried out embroidery before) so I decided to use them in a way that does not involve stitching!

After die-cutting all the elements I needed for the embroidery hoops I used Frayed Burlap Distress Oxide and Vintage Photo and Ground Espresso Inks to give the hoops a more wood-like appearance.

Once the hoops were all glued together, I used the following Ohuhu alcohol markers to colour the mice from the Lawn Fawn Sew Very Mice Stamp Set:

  • Greys: CGII00, CG2, CGII04
  • Pinks: R22, R23
  • Yellows: Y1, Y2, Y3
  • Greens: GY2, GY3, GY4
  • Browns:Y9, Y11, BR1

To create the background, I used the inner part of the embroidery hoop as a stencil. I used Squeezed Lemonade, Spiced Marmalade, and Twisted Citron to match the bright colours of the dress and embroidery projects the mice are working on.

Thanks for reading. Catch ya next time!

Sasha J


Challenges Entered:

Simon Says Stamp Wednesday Challenge – Anything Goes


Products Used

  • Lawn Fawn Sew Very Mice Stamp Set and Lawn Cuts
  • Lawn Fawn Embroidery Hoop Lawn Cuts
  • Lawn Fawn Jet Black Premium Ink Pad
  • Ohuhu Alcohol Markers
  • Squeezed Lemonade Distress Oxide
  • Spiced Marmalade Distress Oxide
  • Twisted Citron Distress Oxide
  • Frayed Burlap Distress Oxide
  • Vintage Photo Distress Ink
  • Ground Espresso Distress Ink
  • Silver Foil Cardstock Recollections
IMG_4886 Large

Simple Blue, New Baby Card – Lawn Fawn

Hi friends! Today’s card is another simple one (and also using only one colour), featuring Lawn Fawn products!

I stamped an image from the Elephant Parade Stamp Set using the Lawn Fawn Jet Black Premium Ink Pad and coloured the elephants using the following Ohuhu alcohol markers:

B250, B120, B220

Once my elephant images was ready to go, I die-cut an A2 card front using the Secret Garden Window die and embossed a different A2 card front using the Cloud Background hot foil plate. Embossing with your hot foil plates is an amazing way to get more use out of them and achieve different styles!

Before assembling my card, I stamped a simple sentiment onto the top layer of my card. And with that, I can now put it all together!

I adhered my cloud background to an A2 card base using tape runner and attached the top layer and elephant image on top of the cloud background using foam tape.

Thanks for reading. Catch ya next time!

Sasha J


Challenges Entered:

Colourful Options: Blue


Products Used

  • Lawn Fawn Elephant Parade Stamp Set and Lawn Cuts
  • Lawn Fawn Secret Garden Window Die
  • Lawn Fawn Cloud Background Hot Foil Plate
  • Lawn Fawn Jet Black Premium Ink Pad
  • Ohuhu Alcohol Markers
  • Foam Tape
mother's day ram Large

Cute Mother’s Day Card! – RAM Stamps

Hi friends, and Happy Mother’s Day! I know that Mother’s Day can be a difficult day for many, so I wish love and peace to everyone today.

Today’s card is a Mother’s Day card I made for my own amazing mother featuring the Canadian Beaver digital stamps from RAM Stamps!

After printing out my digi stamp (along with some extra leaves), I used the following Ohuhu alcohol markers to colour the images:

Beavers: E240, E220, E210, WG050, E310, E170

Wood: E240, E220, E210

Leaves: GY3, GY1, GY4

Once the colouring was finished, I used the following distress oxides along with the cloudy stencil from Lawn Fawn and scene maker stencil from Simon Hurley to create a scene for my beavers:

  • Salty Ocean
  • Twisted Citron
  • Mowed Lawn

I also lightly sprayed the sky to give it a fun effect.

Once I attached all the elements on the card front, I then made the inside of the card using some more leaves along with a matching sentiment. This is my first time doing the inside of a card and I had a lot of fun doing it!

Thanks for reading. Catch ya next time!

Sasha J


Products Used

  • RAM Stamps Canadian Beaver Digital Stamp
  • Lawn Fawn Cloudy Stencil
  • Simon Hurley Scene Builder Mask and Stencil
  • Distress Oxides
  • Blending Brushes
  • Ohuhu Alcohol Markers
  • Spray Bottle with Water
  • Double Sided E-Z Runner Grand Adhesive Tape Dispenser
  • Bearly Art Glue
IMG_4625 Large

Critter Rainbow Grid – Lawn Fawn

Hi friends! Today’s card features some Lawn Fawn Stamp sets in a rainbow grid pattern!

After cutting out the grid, I applied six different oxides/inks to the squares to make up the colours of the rainbow. Then, using some little critters from the Lawn Fawn Wheely Great Day stamp set, I stamped them using Lawn Fawn Jet Black Premium Ink Pad and coloured them using the following Ohuhu alcohol markers to match the colours of the rainbow:

Deer: R2, R1

Fox: Y10, Y4

Bunny: Y6, Y3

Frog: GY2, GY1

Bear: BG68, BG4

Cat: P4, P3

To finish, I stamped a sentiment from the Lawn Fawn Beam Me Up Stamp Set and glued everything into place.

Thanks for reading. Catch ya next time!

Sasha J


Challenges Entered

Two Scrapbook Friends – Use a Grid Pattern

Word Art Wednesday – Anything Goes


Products Used

  • Lawn Fawn Wheely Great Day
  • Lawn Fawn Beam Me Up
  • Spectrum Noir Finesse (Noir Black)
  • Lawn Fawn Lawn Fawn Jet Black Premium Ink Pad
  • Double Sided E-Z Runner Grand Adhesive Tape Dispenser
  • Bearly Art Glue
  • Sizzix Big Shot
  • Stamp Press
  • Ohuhu Alcohol Markers
  • Hammermill Premium Colour Copy 100 lb cardstock
  • Candied Apple Distress Oxide
  • Spiced Marmalade Distress Oxide
  • Squeezed Lemon Distress Oxide
  • Twisted Citron Distress Oxide
  • Broken China Distress Oxide
  • Wilted Violet Distress Ink
simple wedding Large

Simple Wedding Card – Spellbinders “Metamorphosis” Simon Hurley Collection

Hi friends! Earlier this week, I posted a rainbow thank you card using the Stained Window die-cut from Spellbinders designed by Simon Hurley. I had so much fun making that card that I decided to create another card for a different occasion – a wedding card!

This card is much simpler than the other one I made – first, I die-cut the window from white cardstock and glued it onto a white card front on a white A7 card base. Then, I used the Lawn Fawn Big Scripty Words Hot Foil Plates and Spellbinders Silver Glimmer Hot Foil to foil the sentiment “congrats.” To finish, I cut out my sentiment and glued it to the window die cut.

I just loved using this die so much! I will definitely be using it for more cards in the future!

Thanks for reading. Catch ya next time!

Sasha J


Products Used

  • Spellbinders Stained Glass Window Die-Cut by Simon Hurley
  • Lawn Fawn Big Scripty Words Hot Foil Plates
  • Basic White Cardstock
  • Neenah Astrobright Cardstock
  • Recollections Cardstock
  • Spellbinders Glimmer Foil System
  • Sizzix Big Shot
  • Spellbinders Silver Glimmer Hot Foil
  • Bearly Art Glue
  • Double Sided E-Z Runner Grand Adhesive Tape Dispenser
  • Fiskars Titanium Micro-Tip Easy Action Scissors, 6”
  • Fiskars Portable Paper Trimmer, 12”
IMG_4506

Rainbow Thank You Card! – Spellbinders “Metamorphosis” Simon Hurley Collection

Hi friends! Although this card was more time-consuming than others, I LOVE the final product – it’s simple but effective. Despite being time-consuming (having to glue tons of little pieces down…), it was pretty easy to make, dare I say therapeutic!

Using the Spellbinders Stained Glass Window die-cut designed by Simon Hurley from his Metamorphosis collection, I die-cut the window in white cardstock and glued it to an A7 card front. Then using a rainbow of cardstock colours, I die-cut each section of the window in a different colour so that I could carefully glue each piece to the corresponding cut-out on the card front. Although it was a tedious process, I actually liked doing this! It was really satisfying putting each piece in its place – kind of like putting together a puzzle!

After all the pieces were cut and glued, I used the Lawn Fawn Big Scripty Words Hot foil plates from their latest release (such a fun release!) and hot foiled the sentiment “thanks” using the Spellbinders Silver Glimmer Foil. I then fussy cut the sentiment and glued it into the centre of the finished window. To finish, I attached the card front to an A7 card base.

I LOVED this stained window die-cut so much that I decided to make another card (for a different occasion!) using all the same products, which I will post later in the week!

Thanks for reading. Catch ya next time!

Sasha J


Products Used

  • Tweezers
  • Spellbinders Stained Glass Window Die-Cut by Simon Hurley
  • Lawn Fawn Big Scripty Words Hot Foil Plates
  • Basic White Cardstock
  • Neenah Astrobright Cardstock
  • Recollections Cardstock
  • Spellbinders Glimmer Foil System
  • Sizzix Big Shot
  • Spellbinders Silver Glimmer Hot Foil
  • Bearly Art Glue
  • Double Sided E-Z Runner Grand Adhesive Tape Dispenser
  • Fiskars Titanium Micro-Tip Easy Action Scissors, 6”
  • Fiskars Portable Paper Trimmer, 12”
Screen Shot 2023-04-27 at 10.42.21 AM

Peaceful Country Scene – Lawn Fawnatics Challenge #147

Hi friends! Today’s card is for the Lawn Fawnatics Challenge #147: “Create a scene: city vs country,” and I have decided to do country! While I am much more of a city person, a country-themed card came more naturally to me.

Using the Lawn Fawn Cloudy Stencil and Salty Ocean Distress Oxide, I first created a simple sky scene on the card front. I used my Cricut cutting machine to cut out the circle on the card front. I then used the Simon Hurley Create Scene Maker Stencil and Mask along with Mowed Lawn Distress Oxide to create a simple grass field.

I used Lawn Fawn Jet Black Premium Ink Pad to stamp several images and sentiments from the Scootin’ By stamp set. I coloured the images using the following Ohuhu alcohol markers:

Scooter: R1, R2, NG03

Bunny: YR240, YR250, Y120

Balloons: BG3, BG4, RV260, RV270, Y030, Y050

I also die-cut a couple of clouds from the Beary Rainy Day set to add to the card. Once everything was die-cut and ready, I assembled all the elements to create the perfect country scene!

Thanks for reading. Catch ya next time!

Sasha J


Product Used

  • Lawn Fawn Scootin’ By Stamps and Coordinating Dies
  • Lawn Fawn Beary Rain Day Coordinating Dies
  • Lawn Fawn Cloudy Stencil
  • Lawn Fawn Jet Black Premium Ink Pad
  • Simon Hurley Create Scene Maker Stencil and Mask
  • Salty Ocean Distress Oxide
  • Mowed Lawn Distress Oxide
  • Blending Brushes
  • Ohuhu Alcohol Markers
  • White Jelly Roll Pen
  • Basic White Cardstock
  • Sizzix Big Shot
  • Bearly Art Glue
  • Joy! Crafts Foam Tape
  • Fiskars Portable Paper Trimmer, 12”
  • Fiskars Titanium Micro-Tip Easy Action Scissors, 6”
Screen Shot 2023-04-26 at 11.54.07 AM

Embossing with a Stencil?!

Hi friends! Today’s card is made using a new tool I recently added to my craft collection – the Sizzix silicone rubber and impressions pad, which allows you to emboss stencils! I was really excited to try this tool out. It opens the door to so many new crafting possibilities!

Using the Festive Fall Stencil from Echo Park Paper Co, I embossed white cardstock using the already-mentioned Sizzix embossing tools. I lightly sprayed the cardstock with water to get a prominent embossed image.

I then used the stencil normally, ink blending a variety of distress oxides and inks to create a rainbow of bright colour. I used the following oxides and inks:

– Saltwater Taffy

– Spiced Marmalade

– Mustard Seed

– Mowed Lawn

– Salty Ocean

– Wilted Violet

Now that I have ink blended and embossed using the same stencil, I trimmed both panels in a way where the ink-blended panel would align with the embossed panel when placed together – it is kind of like a puzzle! After trimming them, I arranged and attached the pieces to an A2 card base.

For the sentiment, I chose the “celebrate” sentiment from the Hello Bluebird Birthday Script Stamp set and fussy cut it using Fiskars 6” spring-assisted scissors. I then attached the sentiment to the card.

I love how this card turned out! You can never go wrong with a simple card!

Thanks for reading! Catch ya next time!

Sasha J


Products Used

  • Echo Park Paper Co Festive Fall Stencil
  • Hello Bluebird Birthday Script Stamp Set
  • Sizzix Embossing Tools – Silicone Rubber and Impressions Pad
  • Sizzix Big Shot
  • Spray Bottle with Water
  • Lawn Fawn Jet Black premium ink pad
  • Spiced Marmalade Distress Oxide
  • Mustard Seed Distress Oxide
  • Mowed Lawn Distress Oxide
  • Salty Ocean Distress Oxide
  • Wilted Violet Distress Ink
  • Blending Brushes
  • Basic White Cardstock
  • Stamp Press
  • Fiskars Portable Paper Trimmer, 12”
  • Bearly Art Glue
  • Double Sided E-Z Runner Grand Adhesive Tape Dispenser
  • Fiskars Titanium Micro-Tip Easy Action Scissors, 6”
texture rainbow main

Fun with Colour and Texture!

Hi friends! Today’s card is for the current Simon Says Stamp Monday challenge, “Rainbow,” but it’s also a texture challenge. For this challenge, I decided to use a puffy-embossing technique I learned from Marta Debicka – Drop of Sunshine on YouTube. It is a really fun technique and a great way of adding texture and dimension to your crafty projects!

I first stamped seven different animals from a few different Lawn Fawn sets (I will have the sets listed below) so that I could colour each animal a different colour of the rainbow. I used the following Ohuhu alcohol markers:

Red Elephant: R1, R2, R12

Orange Mouse: YR170, YR250, Y120

Yellow Elephant: Y120, Y3, Y030

Green Owl: GY1, GY2

Blue Hedgehog: PB7, B070, B220

Purple Mouse: V030, V250, V230

After fussy-cutting and die-cutting my images, I used Elmer’s School Glue, Black Ranger Embossing Powder, Honey Bee Stamps Perfect Bricks Background Stencil, and a heat tool to create a puffy embossing effect. I did this by mixing some embossing powder with the glue, spreading it over the stencil, and heating it. While simple, it adds a lot of interest to the card!

Before assembling the card, I stamped a sentiment using Lawn Fawn’s Dandy Day Stamp Set onto the card front. I then attached everything to the card base. I used foam squares to elevate each of the animals.

Thanks for reading! Catch ya next time!

Sasha J

Products Used

  • Lawn Fawn Elephant Parade Stamp Set and Coordinating Dies
  • Lawn Fawn Dandy Day Stamp Set
  • Lawn Fawn S’more the Merrier Stamp Set
  • Honey Bee Stamps Perfect Bricks Background Stencil
  • Ranger Black Embossing Powder
  • Heat Tool
  • Palette Knifes
  • Lawn Fawn
  • Ohuhu Alcohol Markers
  • Basic White Cardstock
  • Black Cardstock
  • Fiskars Portable Paper Trimmer, 12”
  • Double Sided E-Z Runner Grand Adhesive Tape Dispenser
  • Foam Squares
  • Sizzix Big Shot
  • Stamp Press
  • Lawn Fawn Jet Black Premium Ink Pad
  • Spectrum Noir Finesse (Noir Black)
  • Fiskars Titanium Micro-Tip Easy Action Scissors, 6”
  • Elmer’s School Glue