IMG_5647 Large

A Trio of Monochromatic! – Simon Says Stamp

Hello friends! Today I am participating in a hop over on Instagram called Create it Three Ways, a monthly hop where we choose a category and create three different cards! The theme for this month is “Birthday.”

I chose to feature the Simon Says Stamp Best Year Yet Stamp set three different ways. I also used the same techniques of splattering water and white paint to create my trio of cards.

I don’t often make several cards at once so participating in this hop is a fun way for me to try new things!

Be sure to head on over to Instagram to hop along and see everyone’s amazing creations!

Thanks for reading. Catch ya next time!

Sasha J


Products Used:

  • Simon Says Stamp Best Year Yet Stamp Set
  • Candied Apple Distress Oxide
  • Mustard Seed Distress Oxide
  • Salty Ocean Distress Oxide
  • Liquitex Basics Titanium White Acrylic Paint
  • Spray Bottle with Water
  • Royal & Langnickel Fan Brush 2
  • Neenah Astrobright Cardstock
Card #1 copy Large

Rainbow Floral Stitched Card – Spellbinders and Simon Says Stamp

Hi friends! Today’s card is my first time ever stitching a card, and I LOVED it – I can’t wait to buy more stitching dies!

If you want to watch me make this card, check out YouTube on making this card below!

Using the Stitched Floral Flip Frame Etched Dies from Spellbinders and cardstock from Neenah Astrobright and Recollections, I die-cut a TON of flowers in a rainbow of colours. Since I was using lighter cardstock for this, I die-cut each stitched flower twice (for a total of four) so that I could glue two of them together to make the cardstock better for the stitching. I also die-cut the simple flower with no stitching four times in each colour – two for the back of the stitched flowers and two to help create the repeating pattern on the finished card.

After stitching all of the flowers and gluing the backings on, I die-cut a large Happy Birthday sentiment three times using the Simon Says Stamp Large Fancy Happy Birthday Die. I glued the sentiments together to give the card some more dimension.

To finish, I attached everything to an A7 card base – the happy birthday sentiment is raised using foam squares.

Thanks for reading. Catch ya next time!

Sasha J


Challenges Entered

Two Scrapbook Friends – Repetitive

Simon Says Stamp IG Challenge – Fun with Flowers

Happy Little Stampers – Anything Goes with Dies


Products Used

  • Spellbinders Stitched Floral Flip Frame Etched Dies
  • Simon Says Stamp Large Fancy Happy Birthday Die
  • Neenah Astrobright Cardstock
  • Recollections Cardstock
  • Embroidery Thread
  • Foam Squares
  • Bearly Art Glue
  • Sizzix Big Shot
  • Sizzix Die Brush and Foam Pad
Craft Roulette #163 Large

A Card with Three Tags?! – My First Craft Roulette Submission! Episode #163

Hi friends! Today’s card is my first ever submission for the Craft Roulette show – this card is for episode #163. This episode was also my first time watching the show and I can’t wait to continue watching and to submit more submissions!

The four parameters for this week’s episode were the following:

– Three tags

– May (I used the word may in my sentiment)

– Rose garden colours (I used green and pink)

– Masking (I used the racoon and the masking of the stencil on the tags)

Let me tell you about how I made this card!

Using the Festive Fall Stencil from Echo Park Paper Co., I combined Twisted Citron and Saltwater Taffy Distress Oxides to create a simple gradient of rose garden colours on the three tags.

I used the Cake Time stamp set from Hello Bluebird to stamp a racoon image and coloured it using the following Ohuhu alcohol markers:

CG5, CG2, CGII00, CGII08, CGII07, RV270, RV260, GY3, GY4, GY7

To finish, I printed out a sentiment in a font I liked and attached everything to an A7 card base!

Thanks for reading. Catch ya next time!

Sasha J


Challenges Entered

Craft Roulette – Episode #163


Products Used

  • Hello Bluebird Cake Time Stamp Set
  • Echo Park Paper Co. Festive Fall Stencil
  • Ohuhu Alcohol Markers
  • Stamp Press
  • Lawn Fawn Lawn Fawn Jet Black Premium Ink Pad
  • Double Sided E-Z Runner Grand Adhesive Tape Dispenser
  • Bearly Art Glue
  • Sizzix Big Shot
  • Distress Oxide
  • Blending Brushes
  • Hammermill Premium Colour Copy 100 lb cardstock
  • Fiskars 12” Portable Trimmer
  • Fiskars 6” Spring Assisted Scissors
CAS cool colours Large

CAS ‘Cool’ Birthday Card – Echo Park Paper Co. & Simon Says Stamp

Hi friends! Today’s card is a clean and simple birthday card using a cool colour scheme! While I love including many colours and elements on my cards, I always love making clean and simple cards once and a while!

If you want to watch me make this card, check out the YouTube video below! This is my first time uploading a card making video to YouTube so I can’t wait for you all to watch it!

I first started by masking off certain parts of the my stencil using sticky notes – I used the Dreamy Dy Diagonal Stencil by Echo Park Paper Co.. Once the stencil was ready, I used the following distress oxides and inks to create a simple line gradient in the bottom corner of my card front:

  • Villanous Potion
  • Wilted Violet
  • Faded Jeans
  • Salty Ocean
  • Mowed Lawn
  • Twisted Citron

To finish, I stamped two small and simple sentiments from the Simon Says Stamp Best Year Yet stamp and adhered my card front to an A2 card base. The stamp set I used is from Simon Says Stamp May Card Kit – I LOVE this card kit and cannot wait to make birthday cards using the supplies in this kit.

Thanks for reading. Catch ya next time!

Sasha J


Challenges Entered

AAA Cards – Hot or Cold Colour Scheme


Products Used

  • Echo Park Paper Co Dreamy Day Diagonal Stencil
  • Simon Says Stamp Best Year Yet Stamp Set
  • Distress Oxides/Inks
  • Blending Brush
  • Lawn Fawn Lawn Fawn Jet Black Premium Ink Pad
  • Double Sided E-Z Runner Grand Adhesive Tape Dispenser
  • Bearly Art Glue
  • Stamp Press
  • Basic White Cardstock
IMG_4617 Large

Fun Splatter Birthday Card – Isabel Cristina Stamps

Hi friends! Today’s card is another card featuring digi stamps from Isabel Cristina Stamps!

I printed and cut an image from the Hooray digi set and coloured it using the following Ohuhu alcohol markers:

Mouse: CG2, CGII00, RV260, RV270

Confetti: B050, B120, B140

I then used Salty Ocean Distress Oxide, a paintbrush, and a spray bottle with water to splatter the distress oxide onto the card front. To finish, I glued everything down.

Thanks for reading. Catch ya next time!

Sasha J


Products Used

  • Isabel Cristina Stamps Hooray Digi Stamp Set
  • Ohuhu Alcohol Markers
  • Bearly Art Glue
  • Salty Ocean Distress Oxide
  • Spray Bottle with Water
  • Paintbrush
  • Neenah Astrobright Cardstock
  • Basic White Cardstock
birthday digi Large

Fun Birthday Card with Digi Stamps! – Isabel Cristina Stamps & Pretty Pink Posh

Hi friends! Today’s card is a birthday card featuring digi stamps from Isabel Cristina Stamps and a stencil from Pretty Pink Posh!

Before printing and cutting the images, I used Mowed Lawn and Saltwater Taffy Distress Oxides along with the Layered Streamers stencil from Pretty Pink Posh to create the background.

After, I used the following Ohuhu alcohol markers to colour the images from the Hooray digi stamp set from Isabel Cristina Stamps:

Bear: Y145, YR209

Fox: YR7, Y4, R28

Hedgehog: R18, R19

Bunny: E210, E220

All: RV270, RV260, R22, R23, GY3, GY4

To finish, I added some highlights to the balloons using a White Jelly Roll Pen and glued everything into place.

Thanks for reading. Catch ya next time!

Sasha J


Challenges Entered

AAA Birthday – Balloons

Seize the Birthday – Balloons

Happy Little Stampers – Birthday Challenge


Products Used

  • Isabel Cristina Stamps Hooray Digi Stamp Set
  • Pretty Pink Posh Layering Streamers Stencil
  • Ohuhu Alcohol Markers
  • White Jelly Roll Pen
  • Bearly Art Glue
  • Saltwater Taffy Distress Oxide
  • Mowed Lawn Distress Oxide
  • Neenah Astrobright Cardstock
  • Basic White Cardstock
Card #3 p Large

Painting with Distress Oxide for a Clean and Simple Card! – Hello Bluebird

Hi friends! Using the Hello Bluebird Little Star Stamp Set, I created this clean and simple card for the Simon Says Stamp Wednesday Challenge. The prompt for this challenge is “Paint It.” I was very excited to make this card because it was also my first time colouring on a new brand of cardstock I just got – the amazing Hammermill Premium Colour Copy 100lb cardstock. Let’s just say I can’t believe it took me this long to buy it. I never want to colour on anything else again! Anyways… let me tell you about how I made this card!

I stamped a cute bear holding a star and die-cut the moon, and coloured them using the following Ohuhu alcohol markers:

Bear + Star: E240, E220, E210, RV270, RV260, Y1, Y050, Y030

Moon: CGII04, CG2, CGII00

I then stamped a sentiment onto my card front before painting a swatch of Faded Jeans Distress Oxide. To do this, I used a paintbrush and treated the oxide as a watercolour – a fun way to add colour to any of your projects!

Once dry, I glued the bear and moon onto the card front and attached everything to a matching card base.

Thanks for reading. Catch ya next time!

Sasha J


Challenges Entered

Simon Says Stamp Monday Challenge – Paint It

Critter Crazy Challenges – Anything Goes

Sweet Stampin’ – Animals


Products Used

  • Hello Bluebird Little Star Stamp Set
  • Stamp Press
  • Ohuhu Alcohol Markers
  • Hammermill Premium Colour Copy 100 lb cardstock
  • Faded Jeans Distress Oxide
  • Paintbrush
  • Spray Bottle with Water
  • Spectrum Noir Finesse (Noir Black)
  • Lawn Fawn Lawn Fawn Jet Black Premium Ink Pad
  • Double Sided E-Z Runner Grand Adhesive Tape Dispenser
  • Bearly Art Glue
  • Sizzix Big Shot
lala main

Summer Birthday Card – La La Land Crafts

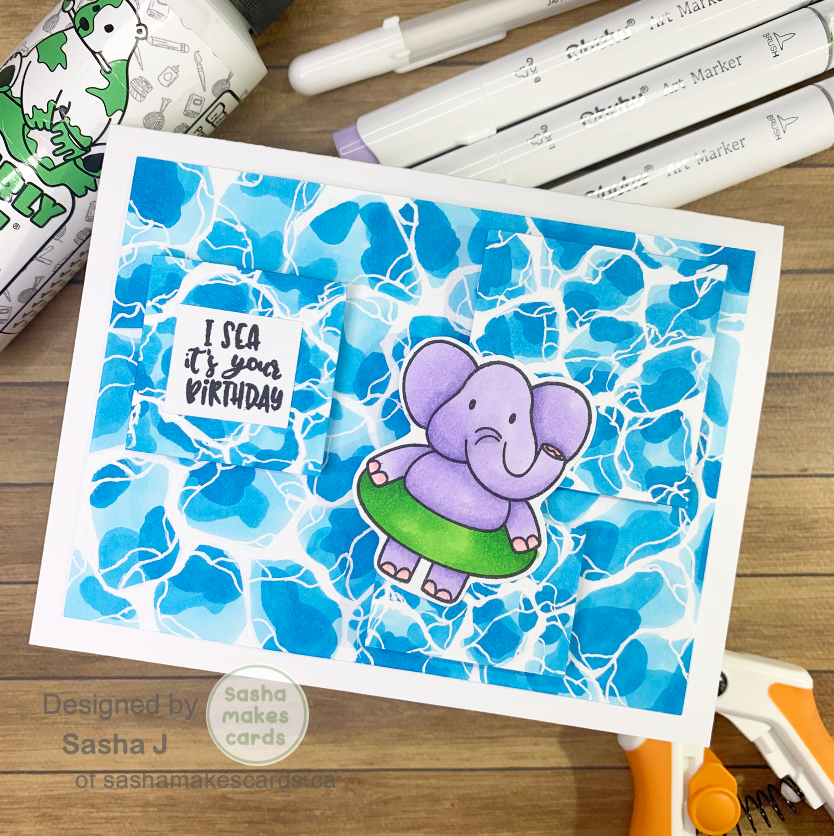
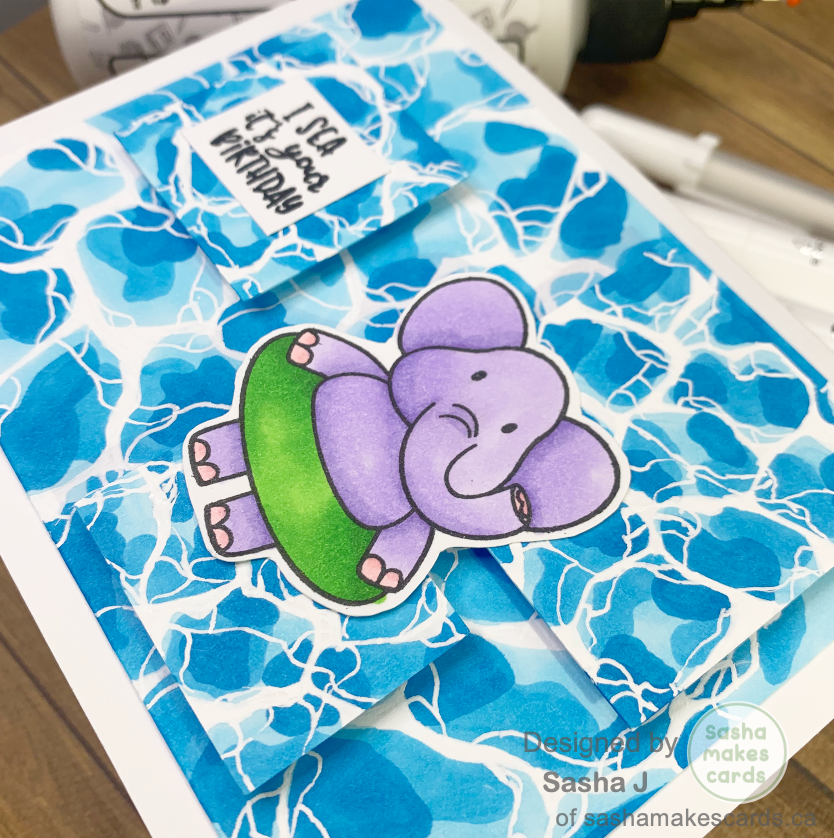
Hi friends! As the weather starts to warm up, I have really started to look forward to summer and all the fun activities that come with the season. So, I decided to make a summer-themed card! This card was made with La-La Land Crafts “Stay Cool” stamp set.

I first stamped this elephant using Lawn Fawn Jet Black premium ink pad and decided on a complementary colour scheme using the following Ohuhu alcohol markers:

Elephant: V230, V250, RV260, RV270

Tube: G170, 190

Using my Fiskars spring-assisted scissors, I then fussy cut my elephant. I tend to avoid using stamp sets without dies in my card designs. However, today – since this is the perfect stamp set for a summer-inspired card – I decided to practice my fussy cutting skills, and I must say that I am rather impressed with myself! You will never improve if you don’t practice.

After fussy cutting the elephant, I started on the background. Using three shades of blue Ohuhu alcohol markers (B050, B070, PB8), and a white jelly roll pen, I created a water effect by laying down different abstract shapes on one another. I created this pattern on both the main card front panel and on three smaller shapes to add depth to the water. The white jelly roll was added on top of the shapes to give more of a water effect.

Using foam squares, I adhered the smaller shapes to the main card front and placed the elephant on top. I also stamped a fun sentiment from the stamp set – you can’t go wrong with a good pun!

I love how this card turned out! I am very proud of the water pattern I’ve created using Ohuhu alcohol markers. I also enjoyed being able to practice my fussy cutting to create a super fun, summer-themed card!

Thanks for reading. Catch ya next time!

Sasha J


Products Used:

  • La La Land Crafts Stay Cool Stamp Set
  • Lawn Fawn Jet Black premium ink pad
  • Ohuhu Alcohol Markers
  • White Jelly Roll Pen
  • Basic White Cardstock
  • Fiskars Portable Paper Trimmer, 12”
  • Stamp Press
  • Bearly Art Glue
  • Double Sided E-Z Runner Grand Adhesive Tape Dispenser
  • Foam Squares
  • Spectrum Noir Finesse (Noir Black)
  • Fiskars Titanium Micro-Tip Easy Action Scissors, 6”
Screen Shot 2023-04-10 at 9.19.05 PM

Shimmer and Shine: Birthday Card with Spellbinders Hot Foil

Hi friends! This card is my entry for the Simon Says Stamp “Shimmer and Shine” Instagram Challenge and their Wednesday Challenge “Happy Birthday” on their blog!

Creating this card included some trial and error as I used hot foiling – something I have never used on a card before and could not quite figure out at first!

Using my Cricut cutting machine, I cut out the yellow triangles and the white rectangle for the sentiment. This helps me make sure everything is a perfect size. I then started the process of trying to understand hot foiling.

After several attempts (only to discover I was placing the hot foil plate on the Spellbinders Glimmer Foil System upside down…), I successfully hot-foiled my sentiment! I used the Spellbinders Happiest Birthday Glimmer Hot Foil Plate and silver Spellbinders foil.

I then die-cut some leaves in various shades of green cardstock from Recollections and Neenah Astrobrights.

After figuring out the layout of the card, I glued everything down. And with this, the card is now done!

Although it took a few attempts to figure out the right way to use hot foil plates, I love how the foil looks – I will have to make more cards featuring hot foil!

Thanks for reading. Catch ya next time!

Sasha J


Products Used:

  • Spellbinders Happiest Birthday Glimmer Hot Foil Plate
  • Spellbinders Silver Glimmer Hot Foil
  • Spellbinders Glimmer Foil System
  • Sizzix Big Shot
  • Leaf die cuts
  • Bearly Art Glue
  • Recollections Cardstock
  • Neenah Astrobright Cardstock
  • Fiskars Titanium Micro-Tip Easy Action Scissors, 6”
  • Double Sided E-Z Runner Grand Adhesive Tape Dispenser