IMG_6818

“Sleep Well” – Tim Holtz Idea-ology

This post contains affiliate links that are of no extra cost to you. Using my affiliate links simply helps me to keep doing what I love – thank you!

Hello friends, and happy Sunday!

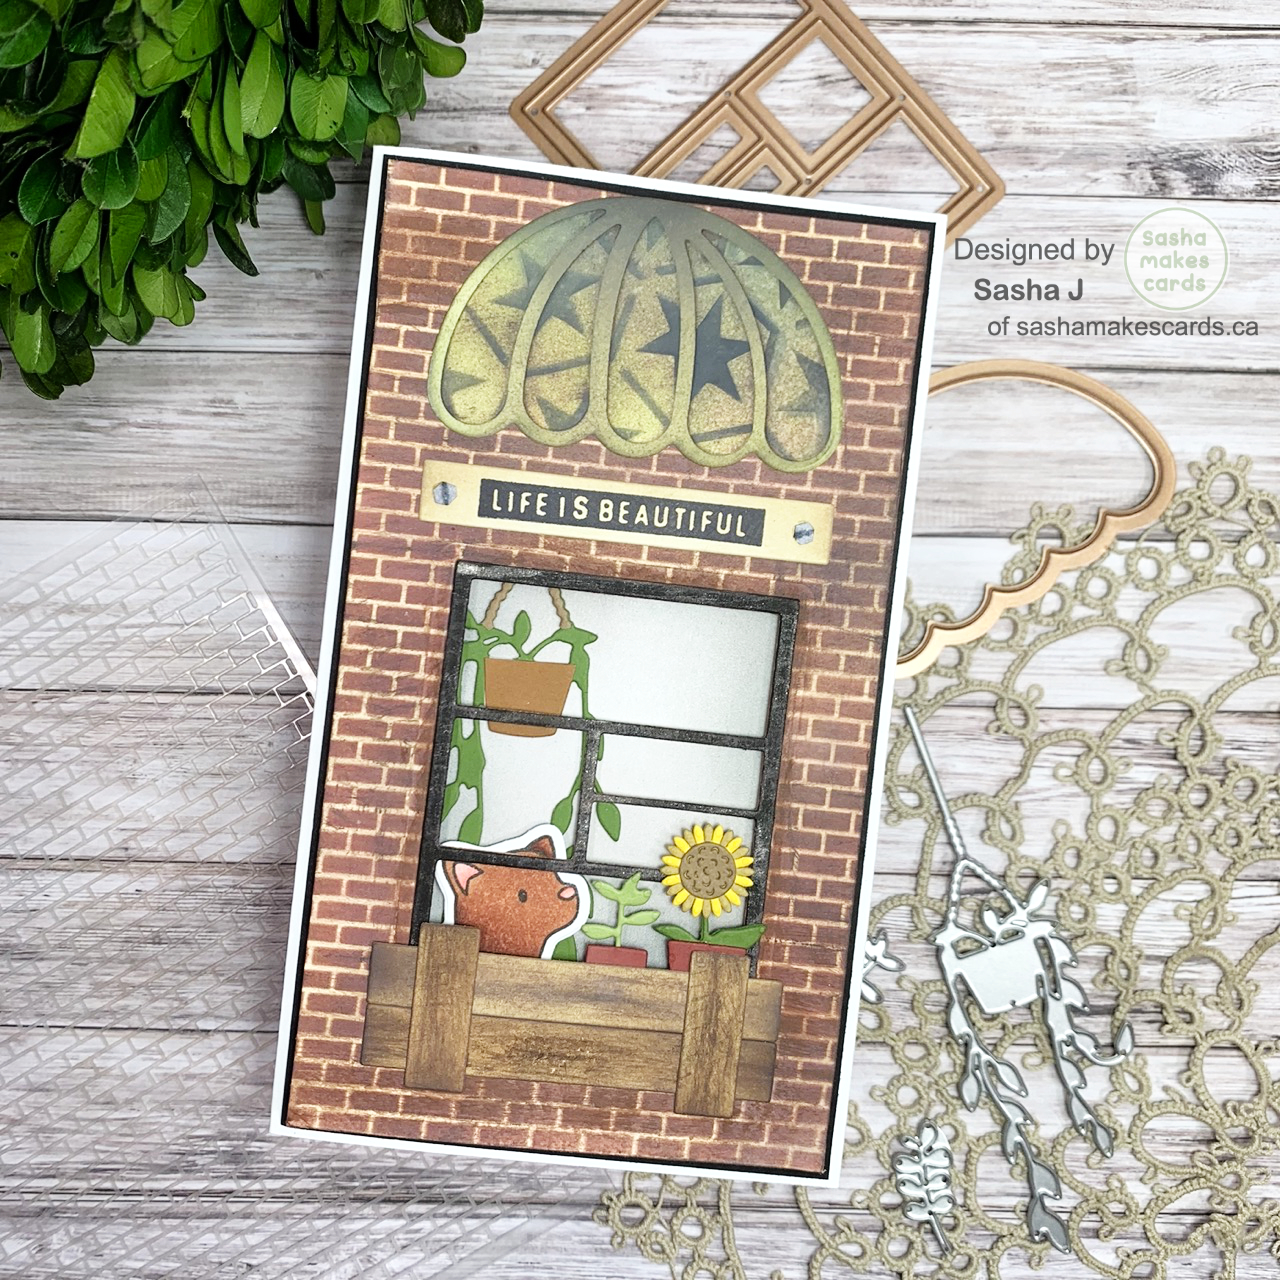
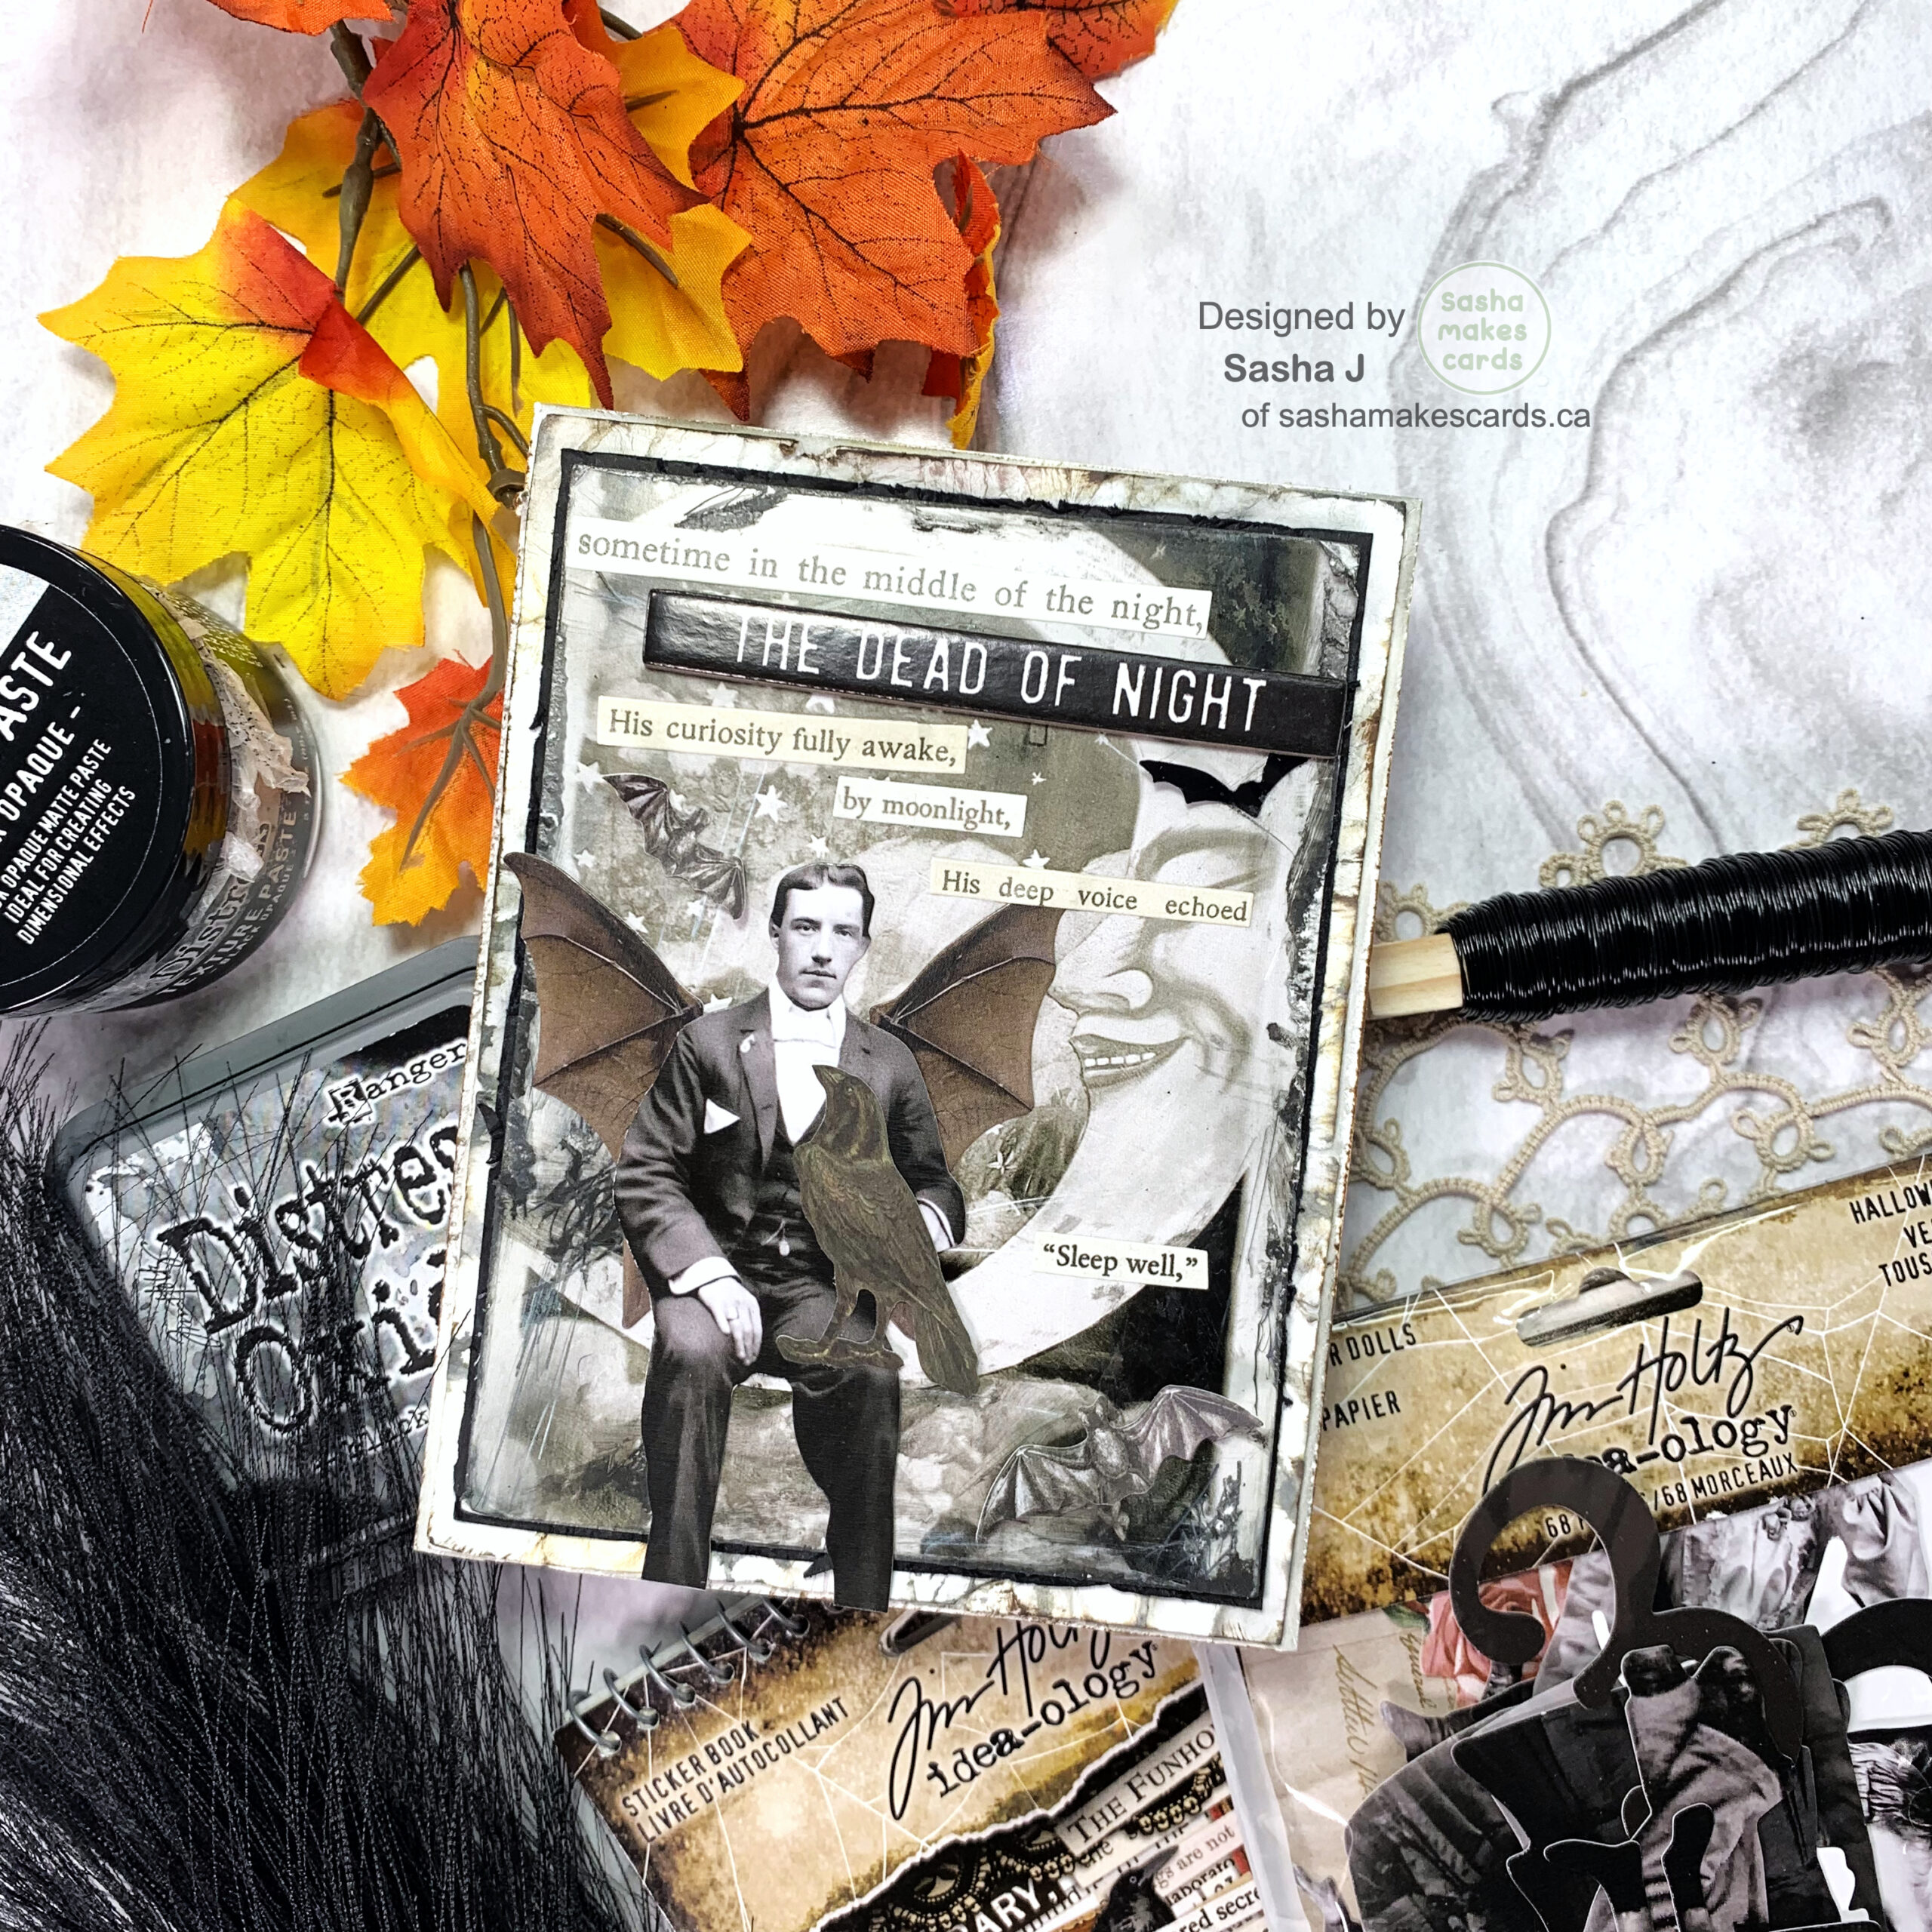
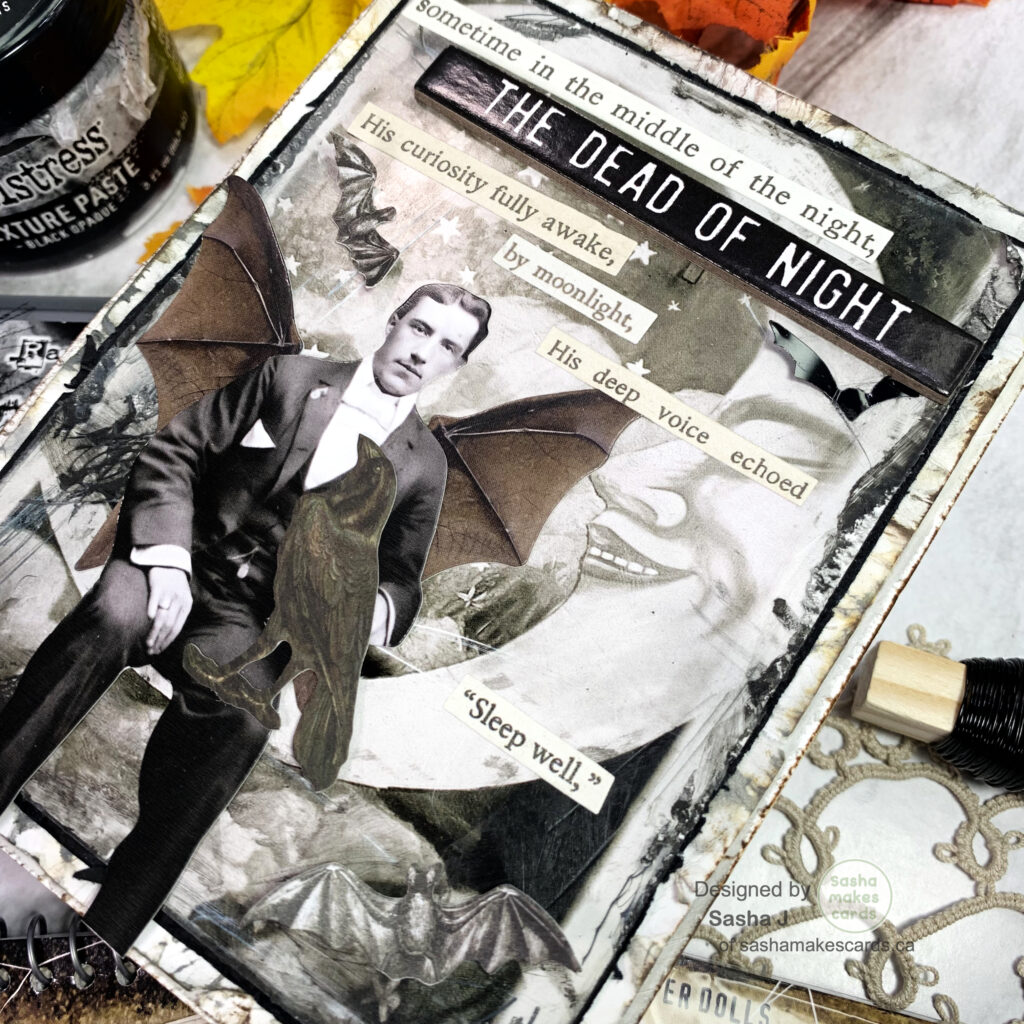
Today’s card is a fun and experimental one using the Halloween 2023 Tim Holtz Idea-ology collection! This was my first time playing around with the Idea-ology line, and it most certainly won’t be my last – I already have plans for more cards!

I first took a layer from the Layers and Paperdolls pack and heavily distressed it. I scraped the edges, scratched it, tore it a little, and dug into it with a pair of scissors – I had a lot of fun destroying everything to make this card! I also added Black Soot Distress Oxide and Black Opaque Texture Paste.

To complement the heavy distressing of this first piece, I did the same to the layers of cardstock that went behind.

Once I was done distressing everything, I started to put it all together. I used a paperdoll from the same set, along with some ephemera. I used the Halloween 2023 sticker book (and a sign from the baseboards and transparencies set) to create a story. Everything was adhered using Bearly Art Glue.

Thanks for reading. Catch ya next time!

Sasha J


Products Used

IMG_6503

Warm, Happy Wishes – CIC #578 Reminder

This post contains affiliate links that are of no extra cost to you. Using my affiliate links simply helps me to keep doing what I love – thank you!

Hello friends! This is your reminder of the current ongoing challenge on the Cupcake Inspirations Challenge blog! The theme for challenge #578 is plaid – the perfect way to welcome the fall season!

I created a warm and welcoming plaid pattern on a card front using the Stampers Anonymous Tim Holtz Plaid Stencil and Candied Apple, Mustard Seed, and Spiced Marmalade Distress Oxides. I also used the same colours of Oxides to blend a gradient so that I could die-cut my sentiment. I used the Sizzix Thinlits Celebration Words: Script by Tim Holtz for the sentiment.

Once ready, I used Bearly Art Glue to attach all the elements.

Be sure to head on over to the Cupcake Inspirations Challenge Blog to submit a card for a chance to be selected as a sweet pick!

Thanks for reading. Catch ya next time!

Sasha J


Products Used

IMG_6435

Monochromatic Plaid – CIC #578

This post contains affiliate links that are of no extra cost to you. Using my affiliate links simply helps me to keep doing what I love – thank you!

Hello friends! Today is the beginning of a new challenge over on the Cupcake Inspirations Challenge blog! The theme for challenge #578 is plaid – the perfect theme for the start of the fall season!

I first started by ink-blending Tim Holtz Hickory Smoke Distress Oxide and Simon Hurley’s Shady on a card front.

I then added a plaid pattern using the Stampers Anonymous Tim Holtz Plaid Stencil and Tim Holtz Distress Black Opaque Texture Paste. I applied a thin layer of the texture paste using a palette knife.

For the sentiment, I stamped an image from the Simon Says Stamp Best Year Yet stamp set using Simon Says Stamp Pawsitively Saturated Intense Black Ink and adhered it using Scrapbook Adhesives foam tape.

Be sure to head on over to the Cupcake Inspirations Challenge Blog to submit a card for a chance to be selected as a sweet pick!

Thanks for reading. Catch ya next time!

Sasha J


Products Used

IMG_5647 Large

A Trio of Monochromatic! – Simon Says Stamp

Hello friends! Today I am participating in a hop over on Instagram called Create it Three Ways, a monthly hop where we choose a category and create three different cards! The theme for this month is “Birthday.”

I chose to feature the Simon Says Stamp Best Year Yet Stamp set three different ways. I also used the same techniques of splattering water and white paint to create my trio of cards.

I don’t often make several cards at once so participating in this hop is a fun way for me to try new things!

Be sure to head on over to Instagram to hop along and see everyone’s amazing creations!

Thanks for reading. Catch ya next time!

Sasha J


Products Used:

  • Simon Says Stamp Best Year Yet Stamp Set
  • Candied Apple Distress Oxide
  • Mustard Seed Distress Oxide
  • Salty Ocean Distress Oxide
  • Liquitex Basics Titanium White Acrylic Paint
  • Spray Bottle with Water
  • Royal & Langnickel Fan Brush 2
  • Neenah Astrobright Cardstock
4th july

Fourth of July – Spellbinders & Sizzix

Hello friends and Happy Fourth of July! While I may be Canadian, I had an idea for a fun (and simple) red, white, and blue Fourth of July card and just wanted to share it!

Using my Fiskars 12″ Portable Paper Trimmer, I trimmed small strips of red, white, and blue cardstock and then glued them onto a piece of white cardstock.

Using the Spellbinders Colour Block Slices etched dies, I then die-cut a couple of triangles when I then glued to an A2 card front.

As for the sentiment, I used the Sizzix Celebration Words: Script Thinlits by Tim Holtz die set.

Thanks for reading. Catch ya next time!

Sasha J


Products Used

  • Spellbinders Colour Block Slices etched dies
  • Sizzix Celebration Words: Script Thinlits by Tim Holtz
  • Neenah Astrobright Cardstock
  • Bearly Art Glue
  • Fiskars 12″ Portable Paper Trimmer
IMG_5411 Large

Old-fashioned Brick Building – CR #169

Hello friends! Today’s card is my submission for episode #169 of Craft Roulette, which has the following parameters:

I had a lot of fun creating this card and experimenting with some styles and techniques I have not used before!

Once I die-cut the window from my card front using the Spellbinders The Sweet Shoppe cutting dies, I started by creating the brick building using Distress Oxides/Inks and the HoneyBee Stamps Perfect Brick Stencil. I also added some brown paint onto the bricks for a more “old-fashioned” look. I used the following Oxides/Inks for the brick wall:

  • Frayed Burlap
  • Vintage Photo
  • Ground Espresso
  • Candied Apple

The black window was distressed using silver paint along with Carved Pumpkin Distress Ink to create rust.

As for the awning (also from The Sweet Shoppe cutting dies set), I used the Star Six stencil from Ciao Bella Paper with Frayed Burlap, Black Soot, Mowed Lawn, and Ground Espresso Distress Oxides/Inks.

The wooden window box (along with the wooden sign with a sentiment from Sizzix) were created using – you guessed it – more Distress Oxides/Inks as well as brown paint! I used the following colours for the wood:

  • Frayed Burlap
  • Vintage Photo
  • Ground Espresso

I used these Copics to colour the dog from the Mama Elephant Puppy Play set:

  • Browns: E15, E18
  • Pinks: R20, R22

The plants were die-cut from various colours of Neenah Astrobright Cardstock and Recollections Cardstock using the Sizzix Garden Shed Die Set designed by Sophie Guilar.

Thanks for reading. Catch ya next time!

Sasha J


Products Used

  • Spellbinders The Sweet Shoppe Cutting Dies by Tina Smith
  • Sizzix Gaden Shed Thinlits by Sophie Guilar
  • Sizzix Good Vibes #3 by Pete Hughes
  • Honey Bee Stamps Perfect Brick Stencil
  • Ciao Bella Paper Star Six Stencil
  • Mama Elephant Puppy Play Stamp and Die Set
  • Copic Sketch Markers
  • Black Soot Distress Oxide
  • Lost Shadow Distress Oxide
  • Frayed Burlap Distress Oxide
  • Vintage Photo Distress Ink
  • Ground Espresso Distress Ink
  • Candied Apple Distress Oxide
  • Mowed Lawn Distress Oxide
  • Carved Pumpkin Distress Ink
for settings

One Die and Stamp Three Ways! – Sizzix

Hi friends! Today I am participating in a hop over on Instagram called Create it Three Ways, a monthly hop where we choose a category (I chose a same stamp and die) and create three different cards! The theme for this month is “summer” and I had a lot of fun creating this set of three summer floral cards in tropical colours!

I created all three cards using the Sizzix Bouquet Thinlits Die by Tim Holtz and a sentiment from the Sizzix Good Vibes #3 Stamp set by Pete Hughes and three tropical distress oxides: Twisted Citron, Pickled Raspberry, and Squeezed Lemonade.

For my first card, I placed the die-cut panel on another panel that I had ink blended a gradient of Twisted Citron going dark to light.

For this card, I used the die-cut panel as a stencil, blending a gradient of the three distress oxides onto a card front.

For my last card, I trimmed down the panel I used as a stencil and adhered it to my card base.

I don’y usually make many cards featuring the same products all at once so I had a lot of creating this set of three summer cards!

Be sure to check out the hop on Instagram so that you can hop along and see all the other amazing cards from some amazing crafters!

Thanks for reading. Catch ya next time!

Sasha J


Products Used

  • Sizzix Bouquet Thinlits Die by Tim Holtz
  • Sizzix Good Vibes #3 Stamp set by Pete Hughes
  • Twisted Citron Distress Oxide
  • Pickled Raspberry Distress Oxide
  • Squeezed Lemonade Distress Oxide
IMG_5210 Large

Paper Piecing a Thank You Card – Sizzix

Hi friends! This card is my submission for episode #167 of Craft Roulette! Here were the parameters:

Using the Sizzix Bird Scene Thinlits die set designed by Jenna Rushforth and the Sizzix Funky Floral #1 Thinlits die set designed by Tim Holtz, I die-cut a bird and a bunch of flowers in farmer’s market colours to fit the theme of the challenge. Before assembling the flowers, I used Distress Oxides/Inks on the edges of the flowers and leaves to add some more colour/interest. I used the following Distress Oxides/Inks:

  • Ground Espresso
  • Vintage Photo
  • Black Soot
  • Frayed Burlap
  • Mowed Lawn
  • Faded Jeans
  • Spiced Marmalade
  • Candied Apple

After assembling all the bird and flowers, I die-cut a thank you sentiment from the Sizzix Celebration Words: Script Thinlits Dies designed by Tim Holtz.

Once ready, I attached my card front onto a black cardstock panel which was then attached to A2 card base.

I had a lot of fun putting this card together. Whenever I do a card with no colouring and little to no stamping, it reminds how much die-cutting and paper piecing can be!

Thanks for reading. Catch ya next time!

Sasha J


Challenges Entered

Craft Roulette – Episode #167

Happy Little Stampers – Anything Goes with Dies

Critter Crazy Challenges – Anything Goes with a Featured Critter


Products Used

  • Sizzix Bird Scene Thinlits die set designed by Jenna Rushforth
  • Sizzix Funky Floral #1 Thinlits die set designed by Tim Holtz
  • Sizzix Celebration Words: Script Thinlits Dies designed by Tim Holtz
  • Distress Oxides/Inks
  • Bearly Art Glue
  • Black Fine Point Sharpie
  • Neenah Astrobright Cardstock
IMG_4830 Small

A Vintage Tea Party – Tim Holtz

Hi friends! Today’s card is my submission for craft roulette episode #164, which has the following parameters:

Once I looked through my stash – I saw the perfect stamp set for this card and knew exactly what I wanted to do.

Using Stampers Anonymous Mini Bird Crazy and Things stamp set from the Tim Holtz collection, I stamped several images and coloured them using the following tea party coloured Ohuhu alcohol markers:

Green Bird: G9, G240, G220, CG2, CGII00

Pink Bird: RV180, RV270, RV260, CG2, CGII00

I also die-cut the sentiment “best wishes” from the Sizzix Celebration Words: Script Thinlits by Tim Holtz three times to stack them to add dimension.

Now, I could go onto the super fun part… experimenting with the background! Using Ground Espresso, Vintage Photo, and Frayed Burlap Distress Oxides/Inks, I added colour to the card front to create a vintage/old effect. Then, I added coffee/tea stains by mixing Frayed Burlap Distress Oxide with water and running alcohol, placing the bottom of my spray bottle in the mixture, and stamping it onto my card front. I love how real this effect looks – I will definitely incorporate this technique into more cards in the future! I also splattered some of this mixture on my card using a Royal and Langnickel fan brush.

As for the hand-drawn lines, I drew brown circles in the corners of the card using a fine-line brown Sharpie to add to the coffee effect.

To finish, I attached everything to my card front and then to a mini slimline card base.

Thanks for reading. Catch ya next time!

Sasha J


Products Used

  • Stampers Anonymous Mini Bird Crazy and Things
  • Sizzx + Tim Holtz Celebration Words: Script
  • Distress Oxides/Inks
  • Ohuhu Alcohol Markers
  • Lawn Fawn Jet Black Premium Ink Pad
  • Spray Bottle with Water
  • Rubbing Alcohol
  • Brown Fine-line Sharpie
  • Bearly Art Glue
  • Hammermill 100 LB Cardstock
  • Fiskars 6” Spring Assisted Scissors
IMG_4797 Large

Two Embossing Powder Techniques in One! – Ciao Bella Paper & Sizzix

Hi friends! While doing some experimenting with some techniques using embossing powder the other day, I created two samples on small pieces of cardstock (as I had no intention of making a card using these pieces). However, I really liked how they turned out so I decided to make a card out of it! You just got to love a completely improvised card!

Using the Star Six stencil from Ciao Bella Paper, I first applied clear embossing ink right onto the stencil and stamping it onto a scrap of white cardstock. For the other way, I layed my stencil on a piece of scrap white cardstock and applied the embossing ink to the cardstock normally. For both samples, I used Princess Gold Embossing powder.

I chose a sentiment from Celebration Words: Script die set from Sizzix by Tim Holtz and die-cut that three times in black cardstock to layer for dimension.

To finish, I attached everything to a top-folding A2 card base.

Thanks for reading. Catch ya next time!

Sasha J


Products Used

  • Ciao Bella Paper Star Six Stencil
  • Sizzix + Tim Holtz Celebration Words: Script Thinlits Dies
  • Ranger Princess Gold Embossing Powder
  • Sizzix Clear Embossing Ink Pad
  • Heat Tool