mother's day ram Large

Cute Mother’s Day Card! – RAM Stamps

Hi friends, and Happy Mother’s Day! I know that Mother’s Day can be a difficult day for many, so I wish love and peace to everyone today.

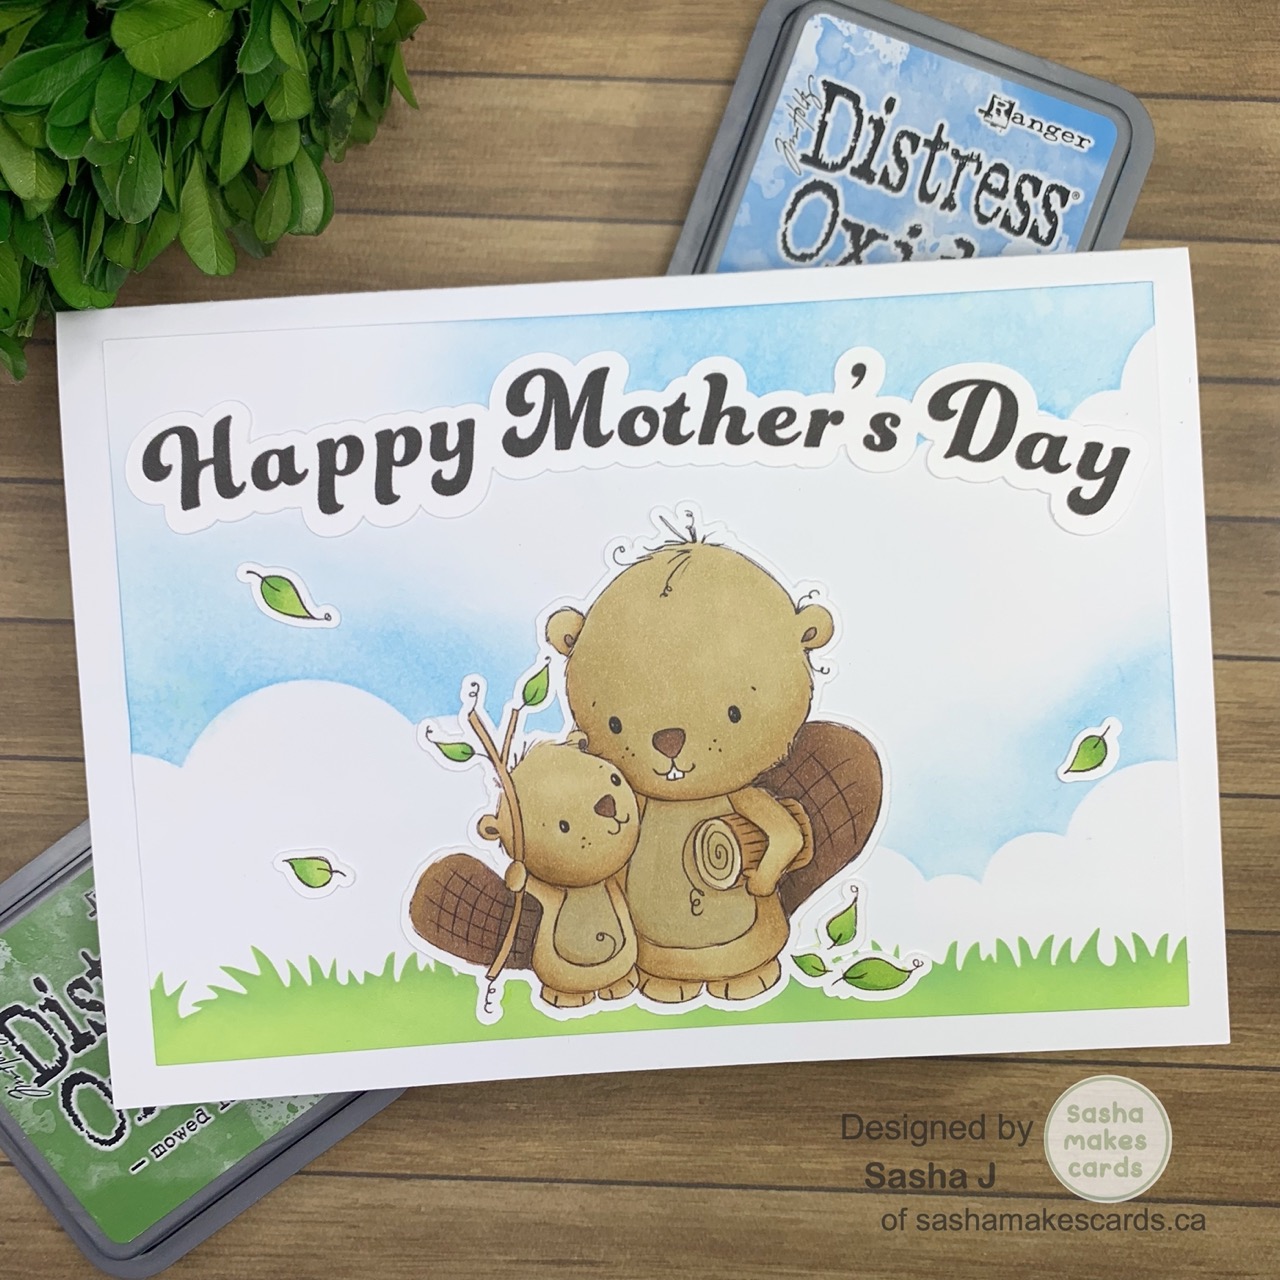
Today’s card is a Mother’s Day card I made for my own amazing mother featuring the Canadian Beaver digital stamps from RAM Stamps!

After printing out my digi stamp (along with some extra leaves), I used the following Ohuhu alcohol markers to colour the images:

Beavers: E240, E220, E210, WG050, E310, E170

Wood: E240, E220, E210

Leaves: GY3, GY1, GY4

Once the colouring was finished, I used the following distress oxides along with the cloudy stencil from Lawn Fawn and scene maker stencil from Simon Hurley to create a scene for my beavers:

  • Salty Ocean
  • Twisted Citron
  • Mowed Lawn

I also lightly sprayed the sky to give it a fun effect.

Once I attached all the elements on the card front, I then made the inside of the card using some more leaves along with a matching sentiment. This is my first time doing the inside of a card and I had a lot of fun doing it!

Thanks for reading. Catch ya next time!

Sasha J


Products Used

  • RAM Stamps Canadian Beaver Digital Stamp
  • Lawn Fawn Cloudy Stencil
  • Simon Hurley Scene Builder Mask and Stencil
  • Distress Oxides
  • Blending Brushes
  • Ohuhu Alcohol Markers
  • Spray Bottle with Water
  • Double Sided E-Z Runner Grand Adhesive Tape Dispenser
  • Bearly Art Glue
CAS cool colours Large

CAS ‘Cool’ Birthday Card – Echo Park Paper Co. & Simon Says Stamp

Hi friends! Today’s card is a clean and simple birthday card using a cool colour scheme! While I love including many colours and elements on my cards, I always love making clean and simple cards once and a while!

If you want to watch me make this card, check out the YouTube video below! This is my first time uploading a card making video to YouTube so I can’t wait for you all to watch it!

I first started by masking off certain parts of the my stencil using sticky notes – I used the Dreamy Dy Diagonal Stencil by Echo Park Paper Co.. Once the stencil was ready, I used the following distress oxides and inks to create a simple line gradient in the bottom corner of my card front:

  • Villanous Potion
  • Wilted Violet
  • Faded Jeans
  • Salty Ocean
  • Mowed Lawn
  • Twisted Citron

To finish, I stamped two small and simple sentiments from the Simon Says Stamp Best Year Yet stamp and adhered my card front to an A2 card base. The stamp set I used is from Simon Says Stamp May Card Kit – I LOVE this card kit and cannot wait to make birthday cards using the supplies in this kit.

Thanks for reading. Catch ya next time!

Sasha J


Challenges Entered

AAA Cards – Hot or Cold Colour Scheme


Products Used

  • Echo Park Paper Co Dreamy Day Diagonal Stencil
  • Simon Says Stamp Best Year Yet Stamp Set
  • Distress Oxides/Inks
  • Blending Brush
  • Lawn Fawn Lawn Fawn Jet Black Premium Ink Pad
  • Double Sided E-Z Runner Grand Adhesive Tape Dispenser
  • Bearly Art Glue
  • Stamp Press
  • Basic White Cardstock
IMG_4617 Large

Fun Splatter Birthday Card – Isabel Cristina Stamps

Hi friends! Today’s card is another card featuring digi stamps from Isabel Cristina Stamps!

I printed and cut an image from the Hooray digi set and coloured it using the following Ohuhu alcohol markers:

Mouse: CG2, CGII00, RV260, RV270

Confetti: B050, B120, B140

I then used Salty Ocean Distress Oxide, a paintbrush, and a spray bottle with water to splatter the distress oxide onto the card front. To finish, I glued everything down.

Thanks for reading. Catch ya next time!

Sasha J


Products Used

  • Isabel Cristina Stamps Hooray Digi Stamp Set
  • Ohuhu Alcohol Markers
  • Bearly Art Glue
  • Salty Ocean Distress Oxide
  • Spray Bottle with Water
  • Paintbrush
  • Neenah Astrobright Cardstock
  • Basic White Cardstock
Card #2 copy Large 2

Rainbow Starburst! – Pinkfresh Studio

Hi friends! Today’s card is bright and colourful (my favourite!) one using the layered sunburst stencil from Pinkfresh Studio! I only recently added this stencil to my craft stash and have been wanting to make a card with it. Once I saw their “Rainbow” challenge for the month of May, I knew using this stencil would be perfect!

This card was fairly easy to make but required a lot of ink blending with many distress inks and oxides. The following is a list of all the inks and oxides I used to create this card:

  • Candied Apple
  • Pickled Raspberry
  • Saltwater Taffy
  • Carved Pumpkin
  • Spiced Marmalade
  • Fossilized Amber
  • Mustard Seed
  • Squeezed Lemon
  • Lucky Clover
  • Mowed Lawn
  • Twisted Citron
  • Faded Jeans
  • Salty Ocean
  • Broken China
  • Villainous Potion
  • Wilted violet

Phew… that was a lot!

Once I was done with the stencil, I simply added a white circle with a sentiment on top to finish the card!

I had such a fun time creating this card using this stencil. I am definitely going to have to make some more using this stencil in other ways!

Thanks for reading. Catch ya next time!

Sasha J


Challenges Entered

Pinkfresh Studio Monthly Challenge – Rainbow

Word Art Wednesday – Weeks #595-596

Simon Says Stamp Wednesday Challenge – Stencil It

Happy Little Stampers – Stencil Challenge


Products Used

  • Pinkfresh Studio Layered Starburst Stencil
  • Distress Oxides and Inks (listed above)
  • Blending Brushes
  • Hammermill Premium Colour Copy 100 lb cardstock
birthday digi Large

Fun Birthday Card with Digi Stamps! – Isabel Cristina Stamps & Pretty Pink Posh

Hi friends! Today’s card is a birthday card featuring digi stamps from Isabel Cristina Stamps and a stencil from Pretty Pink Posh!

Before printing and cutting the images, I used Mowed Lawn and Saltwater Taffy Distress Oxides along with the Layered Streamers stencil from Pretty Pink Posh to create the background.

After, I used the following Ohuhu alcohol markers to colour the images from the Hooray digi stamp set from Isabel Cristina Stamps:

Bear: Y145, YR209

Fox: YR7, Y4, R28

Hedgehog: R18, R19

Bunny: E210, E220

All: RV270, RV260, R22, R23, GY3, GY4

To finish, I added some highlights to the balloons using a White Jelly Roll Pen and glued everything into place.

Thanks for reading. Catch ya next time!

Sasha J


Challenges Entered

AAA Birthday – Balloons

Seize the Birthday – Balloons

Happy Little Stampers – Birthday Challenge


Products Used

  • Isabel Cristina Stamps Hooray Digi Stamp Set
  • Pretty Pink Posh Layering Streamers Stencil
  • Ohuhu Alcohol Markers
  • White Jelly Roll Pen
  • Bearly Art Glue
  • Saltwater Taffy Distress Oxide
  • Mowed Lawn Distress Oxide
  • Neenah Astrobright Cardstock
  • Basic White Cardstock
Card #3 p Large

Painting with Distress Oxide for a Clean and Simple Card! – Hello Bluebird

Hi friends! Using the Hello Bluebird Little Star Stamp Set, I created this clean and simple card for the Simon Says Stamp Wednesday Challenge. The prompt for this challenge is “Paint It.” I was very excited to make this card because it was also my first time colouring on a new brand of cardstock I just got – the amazing Hammermill Premium Colour Copy 100lb cardstock. Let’s just say I can’t believe it took me this long to buy it. I never want to colour on anything else again! Anyways… let me tell you about how I made this card!

I stamped a cute bear holding a star and die-cut the moon, and coloured them using the following Ohuhu alcohol markers:

Bear + Star: E240, E220, E210, RV270, RV260, Y1, Y050, Y030

Moon: CGII04, CG2, CGII00

I then stamped a sentiment onto my card front before painting a swatch of Faded Jeans Distress Oxide. To do this, I used a paintbrush and treated the oxide as a watercolour – a fun way to add colour to any of your projects!

Once dry, I glued the bear and moon onto the card front and attached everything to a matching card base.

Thanks for reading. Catch ya next time!

Sasha J


Challenges Entered

Simon Says Stamp Monday Challenge – Paint It

Critter Crazy Challenges – Anything Goes

Sweet Stampin’ – Animals


Products Used

  • Hello Bluebird Little Star Stamp Set
  • Stamp Press
  • Ohuhu Alcohol Markers
  • Hammermill Premium Colour Copy 100 lb cardstock
  • Faded Jeans Distress Oxide
  • Paintbrush
  • Spray Bottle with Water
  • Spectrum Noir Finesse (Noir Black)
  • Lawn Fawn Lawn Fawn Jet Black Premium Ink Pad
  • Double Sided E-Z Runner Grand Adhesive Tape Dispenser
  • Bearly Art Glue
  • Sizzix Big Shot
Screen Shot 2023-05-02 at 7.18.24 PM

Stamping with Bubble Wrap?! – Trying New Things!

Hi friends! For this card, I decided to do some experimentation with bubble wrap! I can be pretty frugal, and I like to use things to their fullest potential, so when I found some bubble wrap while cleaning out a drawer, I knew I wanted to try stamping with it!

Using Mustard Seed, Salty Ocean, and Candied Apple Distress Oxides, I rubbed some ink on the bubble wrap and stamped it onto white cardstock. Then using the Mini Bird Crazy & Things stamp set from Stampers Anonymous and Tim Holtz, I stamped three of the birds and used the following Ohuhu alcohol markers to colour them:

Yellow Bird: Y1, Y2, Y3

Blue Bird: PB7, PB8, PB9

Red Bird: R1, R2, R12

 I love the birds from this stamp set – they go nicely with the fun and exciting texture of the stamped bubble wrap.

For the sentiment, I used the Sizzix Good Vibes #3 stamp set designed by Pete Hughes and stamped it using Spectrum Noir Finesse Noir Black Ink.

After cutting out the images and sentiment, I attached everything to an A7 card. I used foam squares to elevate the birds.

I had a lot of fun experimenting with a different kind of material for this card and playing with the colours and layout! I am definitely going to be experimenting with more textures and materials in the near future!

Thanks for reading. Catch ya next time!

Sasha J


Challenges Entered

Simon Says Stamp Wednesday Challenge – No Patterned Paper

Critter Crazy Challenges – Anything Goes

Sweet Stampin’ – Animals


Products Used

  • Stampers Anonymous Mini Bird Crazy & Things by Tim Holtz
  • Sizzix Good vibes #3 Stamp Set by Pete Hughes
  • Bubble Wrap
  • Mustard Seed Distress Oxide
  • Salty Ocean Distress Oxide
  • Candied Apple Distress Oxide
  • Ohuhu Alcohol Markers
  • Basic White Cardstock
  • Spectrum Noir Finesse Noir Black Ink
  • Lawn Fawn Jet Black Premium Ink Pad
  • Stamp Press
  • Foam Squares
  • Double Sided E-Z Runner Grand Adhesive Tape Dispenser
  • Bearly Art Glue
  • Fiskars Titanium Micro-Tip Easy Action Scissors, 6”
  • Fiskars Portable Paper Trimmer, 12”
Screen Shot 2023-04-27 at 10.42.21 AM

Peaceful Country Scene – Lawn Fawnatics Challenge #147

Hi friends! Today’s card is for the Lawn Fawnatics Challenge #147: “Create a scene: city vs country,” and I have decided to do country! While I am much more of a city person, a country-themed card came more naturally to me.

Using the Lawn Fawn Cloudy Stencil and Salty Ocean Distress Oxide, I first created a simple sky scene on the card front. I used my Cricut cutting machine to cut out the circle on the card front. I then used the Simon Hurley Create Scene Maker Stencil and Mask along with Mowed Lawn Distress Oxide to create a simple grass field.

I used Lawn Fawn Jet Black Premium Ink Pad to stamp several images and sentiments from the Scootin’ By stamp set. I coloured the images using the following Ohuhu alcohol markers:

Scooter: R1, R2, NG03

Bunny: YR240, YR250, Y120

Balloons: BG3, BG4, RV260, RV270, Y030, Y050

I also die-cut a couple of clouds from the Beary Rainy Day set to add to the card. Once everything was die-cut and ready, I assembled all the elements to create the perfect country scene!

Thanks for reading. Catch ya next time!

Sasha J


Product Used

  • Lawn Fawn Scootin’ By Stamps and Coordinating Dies
  • Lawn Fawn Beary Rain Day Coordinating Dies
  • Lawn Fawn Cloudy Stencil
  • Lawn Fawn Jet Black Premium Ink Pad
  • Simon Hurley Create Scene Maker Stencil and Mask
  • Salty Ocean Distress Oxide
  • Mowed Lawn Distress Oxide
  • Blending Brushes
  • Ohuhu Alcohol Markers
  • White Jelly Roll Pen
  • Basic White Cardstock
  • Sizzix Big Shot
  • Bearly Art Glue
  • Joy! Crafts Foam Tape
  • Fiskars Portable Paper Trimmer, 12”
  • Fiskars Titanium Micro-Tip Easy Action Scissors, 6”
Screen Shot 2023-04-26 at 11.54.07 AM

Embossing with a Stencil?!

Hi friends! Today’s card is made using a new tool I recently added to my craft collection – the Sizzix silicone rubber and impressions pad, which allows you to emboss stencils! I was really excited to try this tool out. It opens the door to so many new crafting possibilities!

Using the Festive Fall Stencil from Echo Park Paper Co, I embossed white cardstock using the already-mentioned Sizzix embossing tools. I lightly sprayed the cardstock with water to get a prominent embossed image.

I then used the stencil normally, ink blending a variety of distress oxides and inks to create a rainbow of bright colour. I used the following oxides and inks:

– Saltwater Taffy

– Spiced Marmalade

– Mustard Seed

– Mowed Lawn

– Salty Ocean

– Wilted Violet

Now that I have ink blended and embossed using the same stencil, I trimmed both panels in a way where the ink-blended panel would align with the embossed panel when placed together – it is kind of like a puzzle! After trimming them, I arranged and attached the pieces to an A2 card base.

For the sentiment, I chose the “celebrate” sentiment from the Hello Bluebird Birthday Script Stamp set and fussy cut it using Fiskars 6” spring-assisted scissors. I then attached the sentiment to the card.

I love how this card turned out! You can never go wrong with a simple card!

Thanks for reading! Catch ya next time!

Sasha J


Products Used

  • Echo Park Paper Co Festive Fall Stencil
  • Hello Bluebird Birthday Script Stamp Set
  • Sizzix Embossing Tools – Silicone Rubber and Impressions Pad
  • Sizzix Big Shot
  • Spray Bottle with Water
  • Lawn Fawn Jet Black premium ink pad
  • Spiced Marmalade Distress Oxide
  • Mustard Seed Distress Oxide
  • Mowed Lawn Distress Oxide
  • Salty Ocean Distress Oxide
  • Wilted Violet Distress Ink
  • Blending Brushes
  • Basic White Cardstock
  • Stamp Press
  • Fiskars Portable Paper Trimmer, 12”
  • Bearly Art Glue
  • Double Sided E-Z Runner Grand Adhesive Tape Dispenser
  • Fiskars Titanium Micro-Tip Easy Action Scissors, 6”
shaped main

Mama Elephant Shaped Card – Up We Go!

Hi friends! Today’s card is for the Simon Says Stamp Wednesday Challenge “Shaped Card!” I have never made a non-squared/rectangular-shaped card, so this was a fun challenge for me. Let me tell you about how I made this card!

After making a circular card base, I stamped some images and a sentiment from the Mama Elephant “Up We Go” stamp and die set. This is an older set but still a really fun one to use, and it was perfect for what I wanted to do!

I coloured the images using the following Ohuhu alcohol markers:

Reds: R1, R2

Oranges: YR170, YR250

Yellows: Y3, Y030, Y050

Greens: GY1, Gy2

Blues: PB7, B070

Purples: V230, V250

I created the background using Salty Ocean and Faded Jeans Distress Oxides and the Lawn Fawn Cloudy Stencil – I wanted the little dog to be floating up into the sky!

I die-cut my coloured images and cropped the corners of my sentiment to better match the shape of the card. I used foam squares to elevate the yellow dog and balloons to add some interest and then attached everything to the card. And with this, the card is finished!

I loved making this circular card. This challenge helped me step outside my comfort zone and make a card I otherwise would not have made. This is one of the many reasons I love participating in challenges!

Thanks for reading. Catch ya next time!

Sasha J


Products Used

  • Mama Elephant Up We Go Stamp and Die Set
  • Stamp Press
  • Ohuhu Alcohol Markers
  • Lawn Fawn Cloudy Stencil
  • Lawn Fawn Jet Black Premium Ink Pad
  • Faded Jeans Distress Oxide
  • Salty Ocean Distress Oxide
  • Blending Brush
  • Basic White Cardstock
  • Sizzix Big Shot
  • Fiskars Titanium Micro-Tip Easy Action Scissors, 6”
  • Fiskars Portable Paper Trimmer, 12”
  • Bearly Art Glue
  • Double Sided E-Z Runner Grand Adhesive Tape Dispenser
  • White Jelly Roll Pen
  • Foam Squares
  • Spectrum Noir Finesse (Noir Black)
  • Round Corner Punch